Showing posts with label Cakes. Show all posts

Monday, 19 August 2013

Angel Food Cake for 1st Blogiversary!


Angel Food Cake
(adapted from Taste)

6 egg whites
3/4 teaspoon cream of tartar
1/4 teaspoon salt
3/4 teaspoon vanilla essence (I use imitation vanilla)
220g (1 cup) caster sugar
100g (2/3 cup) plain flour, sifted

1. Bake oven to 180°C/160°C fan-forced. Line base of 20cm cake pan with baking paper. (Note: the cake pan should be no non-stick material)

2. In a large bowl, beat egg whites until foamy and then add in salt, cream of tartar and vanilla and beat on medium speed until soft peaks form, about 3 minutes. Gradually add in the sugar at about 2 tablespoons at a time. Raise speed to high and beat until peaks are stiff and glossy (but not dry), for approx. 2 minutes.


3. Sift the flour over the egg white mixture in 3-4 parts and gently fold in each addition with a spatula.

4. Gently pour batter into the cake pan. Run a knife through the batter to release any air bubbles, and smooth the top with spoon or offset spatula. Bake the cake for approx 30 minutes, until the cake is golden brown and springs back gently when touched.

5. Invert the pan on a wire rack and let the cake cool for about 1 hr. Carefully run a knife around the side of the cake to loosen, then unmould onto the wire rack. Serve with whipped cream and strawberries if desired.


Tuesday, 2 July 2013

Sticky Date Cheesecake with Caramel Fudge Sauce

If you love cheesecake and sticky date pudding, this is a cake that you must try!

This recipe caught me by the eye the first time when I curiously laid my eyes at the packaging of a cream cheese at my local supermarket. Within my heart, I knew from then on that I would definitely bake it one day. This sticky date cheesecake is super delicious. If you have a sweet tooth, this is definitely the cake for you. However, I tend to see a bipolar response from friends and family with regards to the caramel fudge sauce. Ones who love it can literally drink the sauce by itself ( I do mean it literally!) and ones who don't like their desserts being too sweet will draw back and ascend the white flag. I personally like to have a slice with some drizzles of caramel fudge sauce on top, as illustrated in the photos. If your family is not a big caramel fan to begin with (like mine) then I recommend you to halve the amount as suggested. I made three-quarters of the amount and it was still too much that it had to go to waste in the end. On the contrary, I had wished that if only this recipe was able to give me a bigger cake instead of a loaf-sized one instead. But nonetheless, I know this would not be the last time that I'll be baking it.

Sticky Date Cheesecake

(adapted from Kraft Philadelphia Cream Cheese)

100g butternut snap biscuits, crushed (I used 150g arrowroot biscuits instead...I like my crust thick)
20g unsalted butter melted (I used 50g instead)
375g Original Philadelphia Cream Cheese, softened
1/3 cup caster sugar
1 teaspoon vanilla
1 large egg
2 teaspoons plain flour
5 (125g) fresh dates, chopped

1. Preheat the oven to 160°C/140°C fan-forced. Grease a 9cm x 20cm loaf tin and line with baking paper.

2. Make the crust first by combining crushed biscuits and melted butter in a bowl. Press into the base of lined cake tin. Chill in refrigerator until the cheesecake mixture is ready.

3. Beat the cream cheese, sugar and vanilla with an electric mixer until smooth. Beat in the egg until well incorporated, then stir in the flour and dates with a spatula.

4. Pour the cheesecake mixture on top of the crust and bake for 25 minutes or until just set. Cool in the oven with the door ajar for at least 30 minutes and then transfer into the refrigerator to chill for at least 4 hours or overnight.

Caramel Fudge Sauce
(Make this on the day when serving)

1 cup of brown sugar, firmly packed
80g butter, chopped
1/3 cup cream
Optional: Cream, extra to serve.

In a small saucepan, combine the brown sugar, butter and cream and stir over low heat for 5 minutes until mixture has thickened. Serve immediately with a slice of cheesecake.


Disclaimer: This blog post is based on my personal and honest opinion about this recipe published with permission but has no relation to Mondelez Australia.

Sunday, 2 June 2013

Coconut Cake with Lemon Cream Cheese Frosting

I like my coconut in chocolate and cakes. Moist, fluffy, soft, tangy and not overbearingly sweet are the words to describe this cake. It's simply delicious. I knew something was missing after I finished frosting the cake as it looked a bit too plain. Luckily I had some flaked almonds and coconut shreds to give me a beautiful mess on top of the cake.

Coconut Cake with Lemon Cream Cheese Frosting

(adapted from Raspberri Cupcakes)

250g butter, softened
1 1/2 cups caster sugar
1 teaspoon coconut essence (I didn't use this)
4 eggs
1 cup (80g) dessicated coconut
3 cups self raising flour
250g sour cream
1 cup milk

1. Preheat oven to 180°C/160°C fan-forced. Grease and flour two 18cm round cake tins.

2. Beat butter and sugar until light and fluffy. Add in coconut essence and beat until incorporated then add in eggs one at a time.

3. Add half of the dry ingredients (flour and coconut) followed by wet ingredients (sour cream and milk) and mix until just combined. Add the remaining dry and wet ingredients. Make sure to not overmix.

4. Separate the batter evenly into the two greased tins and bake for 45-50 minutes or until skewer comes out clean. Cool the cake in the tin for 10 minutes, then turn out onto a cooling rack to cool completely.

Lemon Cream Cheese Frosting

250g cream cheese
25g butter, softened
1 cup icing sugar
1/2 teaspoon lemon zest
1/2 cup thickened cream

Beat the cream cheese and butter until smooth. Add the lemon zest then gradually add in the icing sugar and beat until incorporated. Using clean beaters, beat the cream until stiff peaks form then add to the cream cheese mixture and mix until smooth. Sandwich icing between the two cake layers and crumb coat the cake with icing. Use the remaining icing to cover the cake completely.


Wednesday, 15 May 2013

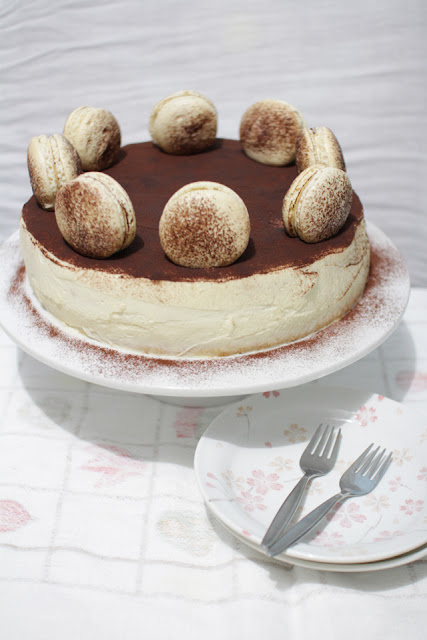
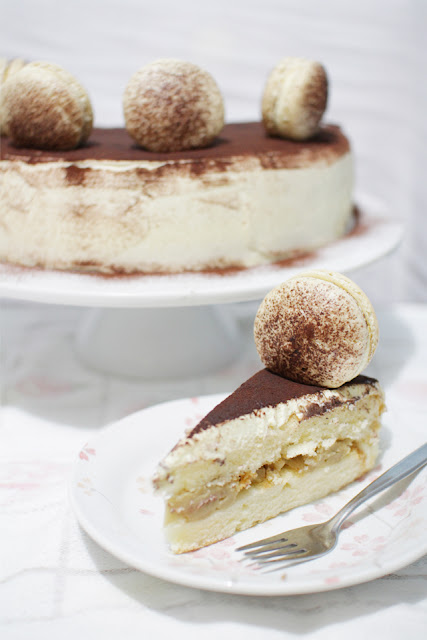
A Tiramisu hybrid: Tiramisu Chiffon Cake and Macarons

How can I ever get sick of tiramisu? Maybe never. It's quite a challenge yet refreshing to bake something different to the original version. I had this cake envisioned in my mind for about a month now and had finally put it altogether for Mother's Day. It's a day to celebrate everything that a mother can give, the unconditional love, the wise advice, the shoulders that spread like wings for us to lean on. She's the pillar of the family that keeps everything in harmony and she's the definition of blissful happiness even though she doesn't appear to be perfect to others. I just wanted to say Happy Mother's Day to my beautiful Mother as well as to all the amazing mum's out there.
Personally, I had cravings for a chiffon cake which then sort've replaced the idea of using a sponge cake instead which would've fitted the tiramisu hybrid theme better. The day was quite a disaster. The chiffon cake dried up overnight since I didn't wrap it in cling film to keep it moist. But luckily it was saved in the end when it got covered by the mascarpone topping. I should've made double the amount of coffee creme patissiere to spread between the layers since I was struggling to have it evenly spread across the cake and a lot of my macarons cracked to my disappointment. It seems like disasters befall whenever I want to deliver the best. Fortunately, everything still tasted good and that was what matters. The coffee crème patissiere wasn't too sweet and the cocoa powder sifted on top gave this cake a good balance in regards to the sweet scale.
There are a few variations that could've been made I guess. You could soak the cake in coffee syrup to maintain it's moisture to have it more like a tiramisu-styled cake. A coffee flavoured chiffon cake or even a sponge cake would suffice. Crème patissiere is hard to spread so you could defrost it first then spread it out or replace with a coffee cream or frosting you like. Whatever you wish to do, have fun and enjoy the cake!
 

Tiramisu Chiffon Cake and Macarons

Coffee Macarons
(adapted from Bravetart)
 
115g almond meal
230g icing sugar
144g egg whites, room temperature (You can zap fresh egg whites from the fridge in the microwave on defrost for 10 seconds)
72g caster sugar
1 teaspoon water
1 teaspoon coffee powder
1. Sift the almond meal and icing sugar together in a medium bowl and set them aside.

2. Mix the water and coffee powder together in a small bowl. Using an electric mixer in a medium bowl, beat the egg whites together with the caster sugar and coffee mixture at medium speed for 3 minutes (4 on a Kitchenaid).

3. Increase the speed to medium-high (7 on a Kitchenaid) and whip for another 3 minutes, then increase to highest speed (8 on a Kitchenaid) and beat for another 3 minutes. You should have a very stiff, dry meringue, if not beat for another minute or until it does so. When you remove the whisk attachment, there will be a clump of meringue in the centre, just knock the whisk against the bowl to free it.

5. Dump in the sifted dry ingredients all at once and fold them with a rubber spatula. Use both a folding motion (to incorporate dry ingredients) and a rubbing/smearing motion to deflate the meringue against the side of the bowl. Take care not to overmix, the mixture should flow like lava and a streak of mixture spread over the surface of the rest of the mixture should disappear after 30 seconds to a minute. Approximately around 30 strokes/folds of the batter will be just enough.

6. Place in a piping bag and pipe rounds of about 3cm diameter on lined baking sheets or silicon baking mats. Hold onto the baking sheet and tap them hard against your bench top to remove any extra bubbles from your piped shells. Sift some cocoa powder on top if desired. Preheat the oven to 150° C/130°C fan-forced. Leave shells on bench to dry for about 30 minutes to an hour, or until a shell forms around the piped macaron (I generally leave them for 20-30 minutes).

7. Bake for about 18 minutes, or until you can clearly peel the parchment paper away from a macaron. Cool thoroughly on the pans before peeling the cooled macarons from the parchment. Use a spatula or plastic scrape if necessary.

8. Pipe the mascarpone frosting (recipe below) on a macaron shell, then sandwich it with another macaron shell. Refrigerate overnight. Can be stored in the fridge in an airtight container for several days.
 
Chiffon Cake
(adapted from Inspired Nest)
 
Part I
6 large egg yolks
3/4 cup water
1/2 cup vegetable or canola oil
1 teaspoon vanilla extract (I use vanillin)
3/4 cup caster sugar
2 1/2 teaspoon baking powder
1 teaspoon salt
1 1/2 cup plain flour
 
Part II
6 large egg whites
1/2 teaspoon cream of tartar
3/4 cup caster sugar
 
1. Preheat the oven to 175°C/155°C fan-forced. Sift flour, baking powder and salt in a bowl and set aside.
 
2. In a large mixing bowl, beat egg yolks, water, oil, vanilla and sugar together until combined. At low speed, add in the flour mixture and beat until the batter is smooth.
 
3. In another large mixing bowl, beat the egg whites and cream of tartar at high speed for approximately 1 minute. Reduce to medium speed and gradually add in the sugar. Continue beating until very stiff and shiny. Be careful not to overbeat the egg whites. Do the overturn test where the egg white mixture shouldn't fall out from the bowl.
 
4. Using a spatula fold in the egg white mixture into the egg yolk mixture until well combined.  
 
5. Bake in a 9-10 inch no non-stick cake tin for 55-65 minutes or until the cake springs back when lightly touched.
 
6. Invert and cool in cake tin over a wire rack. When cool, loosen edges with a knife and remove from the cake tin.
 
Notes:
- I used 2 no non-stick cake tins (25cm in diameter and 5cm in height).
- Don't fill cake batter more than 1/3 full of the cake tin or else there'll be an overflow.
- The remainder of my cake batter was put into cupcake moulds and baked for approximately 30 mins
- Be gentle when removing the cake from the tin, because it sticks to the base the cake can rip easily.

 
Coffee Crème Pâtissière
(Note: I would double the amounts below to use for the entire cake)
3 egg yolks
60g caster sugar
25g cornflour
1 teaspoon instant coffee powder
1/2 vanilla pod (I substituted with 1/2 teaspoon vanillin)
250ml whole milk
15g unsalted butter, cubed

1. In a large saucepan boil milk and vanilla over low-medium heat. In a medium bowl, whisk egg yolks, sugar, cornflour and green tea powder together.

2. Slowly add boiled milk to the egg mixture whilst whisking. Return mixture to the stove over low-medium heat and continue whisking until it gets thick in texture.

3. Add in the butter and whisk until melted and crème is smooth. Put a cling film over and leave to cool in the fridge for 30-60 minutes. It can also be left overnight.
 
 
Mascarpone Frosting
(adapted from Martha Stewart)
 
250g mascarpone cheese
400g thickened cream
1/2 cup icing sugar, sifted
 
Using an electric mixer at medium speed, beat the cream until stiff peaks form. Be careful not to overbeat. In another bowl, beat the mascarpone cheese and icing sugar until smooth. Gently fold the whipped cream into the mascarpone mixture until fully incorporated. Use immediately.
 
 
Assembly
1. Spread the coffee crème patissiere as evenly across a layer of cake with a metal spatula running under hot water. Place the second layer of cake on top.
 
2. Crumb coat cake with a thin layer of the mascarpone frosting around the cake then spread the remainder afterwards. Dust cocoa powder on top if desired.
 
3. Place the tiramisu macarons on top of the cake when serving, or else it'll become soggy.
 

Sunday, 28 April 2013

Apple Crumble Cake


Apple Crumble Cake

(adapted from Raspberri Cupcakes)

Cake:
230g self raising flour
pinch of salt
120g butter, softened
120g sugar
2 eggs
1 teaspoon vanilla extract (I used vanillin)
2 tablespoons milk
2 small Granny Smith apples, peeled and sliced thinly (I just used 1 big apple)
ground cinnamon

Crumble:
125g self raising flour
90g sugar
45g butter, diced
1 1/2 tablespoon water for mixing
ground cinnamon

Cake:
1. Preheat oven to 180°C/160°C. Grease a 19cm square/round cake tin.

2. Using an electric mixer, beat butter and sugar until light and creamy. Add in eggs and vanilla and beat until just combined. Add in flour, milk and salt and beat until combined. Don't overbeat the batter.

3. Spread mixture evenly over the base of the tin and evenly distribute the apple slices on top to cover the whole surface. Sprinkle ground cinnamon over the apples.

Crumble:
4. In a clean bowl, put flour, sugar and butter in a bowl and rub mixture between your fingers to combine them together. Add in 1/2 teaspoon of ground cinnamon then gradually add in 1/2 teaspoon of water at a time whilst combining mixture with your fingers. Continue rubbing the mixture until it starts to form fairly big clumps of 0.5cm.

5. Spread crumble over mixture over the top of the apples and pat it down slightly.

6. Bake for 45 minutes until the crumble is golden brown. Allow cake to cool for 15 minutes before serving.

Sunday, 21 April 2013

Green Tea Layered Crème Pâtissière Chiffon Cake

I love green tea cake. I can still remember the bursting green tea flavour and cottony soft texture of the first time I tried a green tea sponge roll cake with a thin layer of cream and red bean paste. Ever since then I told myself that I must bake it some day.
Last week one of my supervisors turned 70 and knowing that he likes drinking green tea, there is no better choice than to bake him a green tea cake. But then, he has put me to the test of what type of cake I should bake and design for him. He prefers savoury and avoids sweets. The cakes I usually bake are sweet and usually have a big slab of cream on top. Although green tea cakes aren't sweet by itself but I was not going to settle down with a plain looking cake without any decoration.   
I searched high and low over the world wide web looking for the most suitable green tea cake. I even observed the designs of green tea cakes in shops but they were all packed with cream so it wasn't all that helpful. Somehow, my eyes were laid on the green tea chiffon cake. I've never made chiffon cake before and it got me worried because sponge cakes have never worked properly for me. I was literally able to predict that the percentage of success would be leaning towards a fail and on my first try, I got 2 flat pancake layers of chiffon cake. I started to panic because I only had one more day left to bake the actual cake and if this fails, I don't know what else I could do (borderline crying). I went online and did more research on troubleshooting issues with chiffon cakes here and here where on my second try I succeeded. Although the cake succeeded, I didn't add enough green tea powder. I would recommend double the amount of green tea powder instead of the 2 teaspoons that I've added. I also recommend going on Youtube to see how to fold egg whites properly in a chiffon cake if you're unsure how to do it properly as that is one of the very crucial steps.
Now to talk about the green tea crème patissiere which is the best part of the cake. Full of strong bitter-sweetness and made up for the inadequacy of green tea flavour in the chiffon cake. I can literally just scoop out the crème patissiere and eat it by itself as it is so good. The crème patissiere can be made a day in advance but it would be pretty cumbersome during the layering process once it is set. I had to defrost it in the microwave for 30 seconds or more and then run the spatula in boiling water before spreading it across the cake. Crème patissiere definitely does not look as clean when it comes to decorating cakes and so I covered the clumpy texture with extra green tea powder, tada!

Green Tea Layered Crème Pâtissière Chiffon Cake

Green Tea Chiffon Cake
(recipe adapted from Inspired Nest)
Part I
6 large egg yolks
3/4 cup water
1/2 cup vegetable or canola oil
1 teaspoon vanilla extract (I use vanillin)
3/4 cup caster sugar
2 1/2 teaspoon baking powder
1 teaspoon salt
1 1/2 cup plain flour
4 teaspoons green tea powder
Part II
6 large egg whites
1/2 teaspoon cream of tartar
3/4 cup caster sugar
1. Preheat the oven to 175°C/155°C fan-forced. Sift flour, baking powder, salt and green tea powder in a bowl and set aside.
2. In a large mixing bowl, beat egg yolks, water, oil, vanilla and sugar together until combined. At low speed, add in the flour mixture and beat until the batter is smooth.
3. In another large mixing bowl, beat the egg whites and cream of tartar at high speed for approximately 1 minute. Reduce to medium speed and gradually add in the sugar. Continue beating until very stiff and shiny. Be careful not to overbeat the egg whites. Do the overturn test where the egg white mixture shouldn't fall out from the bowl.
4. Using a spatula fold in the egg white mixture into the egg yolk mixture until well combined.  
5. Bake in a 9-10 inch no non-stick cake tin for 55-65 minutes or until the cake springs back when lightly touched.
6. Invert and cool in cake tin over a wire rack. When cool, loosen edges with a knife and remove from the cake tin.
Notes:
- I used 2 different sized no non-stick cake tins (25 and 29cm in diameter and 5cm in height).
- Don't fill cake batter more than 1/3 full of the cake tin or else there'll be an overflow.
- Be gentle when removing the cake from the tin, because it sticks to the base the cake can rip easily.
Green Tea Crème Pâtissière
3 egg yolks
60g caster sugar
25g cornflour
1 teaspoon green tea powder
1/2 vanilla pod (I substituted with 1/2 teaspoon vanillin)
250ml whole milk
15g unsalted butter, cubed
1. In a large saucepan boil milk and vanilla over low-medium heat. In a medium bowl, whisk egg yolks, sugar, cornflour and green tea powder together.
2. Slowly add boiled milk to the egg mixture whilst whisking. Return mixture to the stove over low-medium heat and continue whisking until it gets thick in texture.
3. Add in the butter and whisk until melted and crème is smooth. Put a cling film over and leave to cool in the fridge for 30-60 minutes. It can also be left overnight.
Note: This amount was enough for the rectangular cake I cut out from the round layers. My cake was approximately 10cm x 20cm. So you might want to double the amount if you want to fill the entire cake.
Assembly
1. Spread a layer of crème patissiere on top of the first layer of cake. Put slices of strawberries on top.
2. Top with the second layer of cake and add the remaining crème patissiere on top. Sprinkle with extra green tea powder on top (optional) and decorate with halved strawberries.

Sunday, 14 April 2013

Moist Butter Cake

I hate being sick. It's the most annoying time to have a coughing fit with bundles of snot especially when you're running out of time to finish things before the deadline.

What makes everything depressing is that I've been on a restraining order from consuming my favourites: chocolate, cookies, peanut butter etc. So then the loop hole around this was perhaps I can have a plain cake that wouldn't be a burden on my coughs.
This was a very good opportunity for me to travel back in time to one of my fondest childhood memories. I still remember very clearly from my childhood , the first time when I ate the Golden Butter Cake my papa had baked for the whole family. I pointed to a cake mix on the supermarket shelf and told him that I wanted to eat this cake. Without much hesitation, he agreed to buy and bake it for me. 
For numerous times I ran back and forth to the kitchen to peek over my papa's baking. When the kitchen was filled with the buttery aroma I got very impatient. I couldn't wait to eat the cake. The cake tasted splendid. I went from one slice to another.
I decided to give Ju's Butter Cake a try. It's moist and full of buttery goodness but is still rather different from the Golden Butter Cake from my memories. The texture and appearance is not quite the same. Not to say the butter cake is no good, it just hasn't pushed the buttons in my memory as there is a special place in my heart for this particular cake. However, with this butter cake I still can still go from one slice to another and won't get sick of it.  

Butter Cake

(recipe adapted from The Little Teochew)
195g (approx. 3/4 cup) plain flour
1 1/2 teaspoon baking powder
1/2 teaspoon salt
170g butter, softened
225g sugar
1 large egg, plus 1 large egg yolk
1 1/2 teaspoon vanilla extract (I use Imitation Vanilla)
120ml (12 tablespoons) milk
1. Preheat the oven to 190°C/170°C fan-forced. Grease and flour a 9 inch cake tin.
2. Sift together the plain flour, baking powder and salt in a medium bowl.
3. Using an electric mixer at medium speed, cream butter and sugar until fluffy.
4. Beat in egg, egg yolk and vanilla until well-combined.
5. At low speed, add in the dry ingredients in 3 parts, alternating with milk.
6. Switch mixer to medium speed and beat for 10-15 seconds, just until the batter appears uniform.
7. Pour batter into the cake tin and smooth top with spatula or knife.
8. Bake for approximately 40 minutes, or until it reaches a dark golden colour and when the inserted skewer comes out clean.
9. Allow the cake to cool for 5 minutes before transferring the cake onto a cake stand or platter.

Friday, 29 March 2013

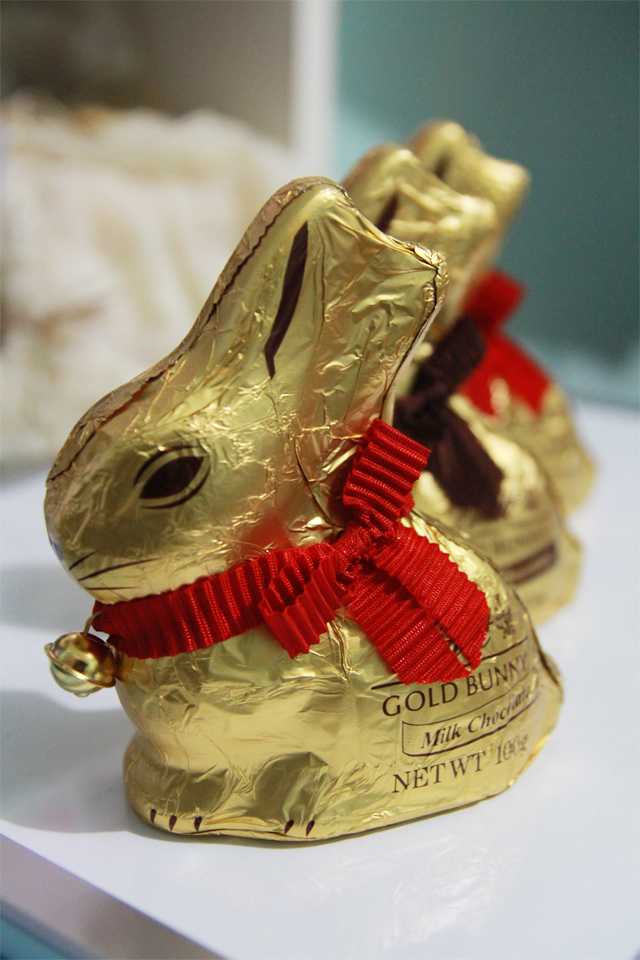
Happy Easter everyone!


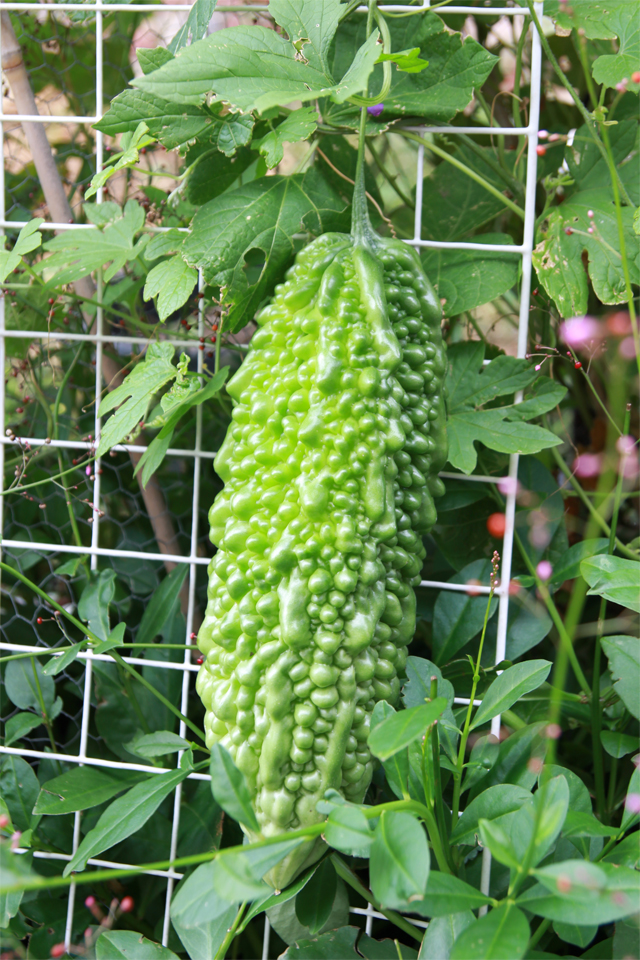
Today, we celebrated the fruits of my dad's labour in the backyard with a large bitter gourd. Bitter gourd is the least of my favourite vegetables although it's meant to be good for you but as it's name suggests...it's BITTER! But for some reason we were all excited and enthusiastic with our cameras to snap away at our very first harvest of 2013. It also turned out that the bitterness was acceptable to my tastebuds this time. But I guess that's all due to my dad's wonderful cooking of the bitter gourd. It's definitely a Good Friday for our family today.
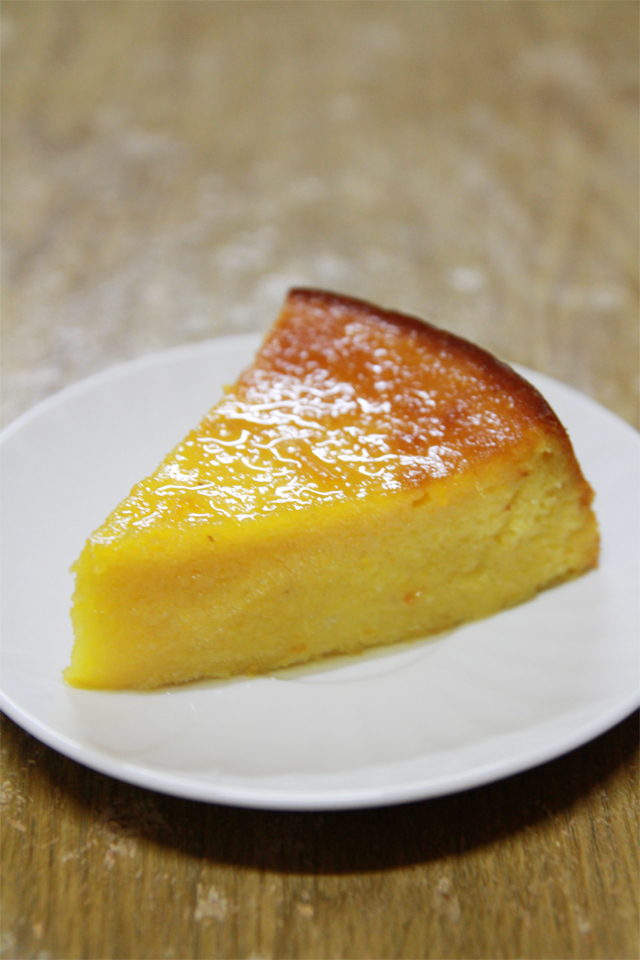
Last week, I actually baked this flourless orange cake but still wanted to share it with you all. I was scavenging for the ingredients that I already have in the kitchen to come up with something good to eat. I realised I still had oranges left and immediately craved for the flourless orange cake once again. Although this is my second time making it, I ended up boiling an extra orange by not reading the recipe carefully. What do I do with the extra orange? Make orange syrup for the cake. Oh em gee, the cake was divine and delicately moist with that extra ooze of syrup drizzled on top. Such a beautiful mistake :)


Flourless Orange Cake with Orange Syrup

(cake recipe adapted from Citrus and Candy and you can get the orange syrup recipe from here)

2 medium oranges, seedless
6 eggs
1 cup caster sugar
1 1/2 teaspoons baking powder
1 1/2 cup almond meal

1. Wash and scrub the outside of the oranges and place the whole orange (skin and all) in a pot. Fill with cold water to cover. Place over medium-high heat and bring to boil.

2. Once it's boiled, allow it to simmer for approx. 20mins and replace with cold water and bring it to boil again. Repeat this process once again.

3. On the third round, once the oranges are boiled, let it simmer for about an hour and then drain the oranges. Set them aside to cool.

4. When the oranges have cooled, roughly chop them to pieces and remove any seeds and white pith. Place them in a blender or food processor (skin and all) and blend until you get a fine puree. Measure out 1 1/4 cups of puree and store the rest in a container (if any) for next use.

5. Preheat oven to 175°C/155°C fan-forced. Grease and flour a 23-25cm cake tin. Alternatively, you may line the base with baking paper.

6. Using an electric mixer, beat the eggs, sugar and baking powder until thickened and pale in colour. Add in almond meal and mix well.

7. On low speed, gradually add in the orange puree in 2-3 batches. Beat for at least 20sec after each addition.

8. Pour the batter into the cake tin and bake for 50min ~ 1hr or until when the skewer comes out clean from the cake.

9. Allow the cake to cool for 10min before transferring it to a cooling rack.
Time to dig into the deliciously moist cake!

Wednesday, 13 February 2013

Chinese New Year Baking Project 2013!

White Chocolate Raspberry Cupcakes and Dark Chocolate and Cherry Brownie Tarts
Gong Xi Fa Cai! Happy Chinese New Year! May the year of the snake be a prosperous year where you'll be entwined with good fortune, good health and happiness. One other good news that I'd like to share with everyone is that I finally got myself a DSLR! I'm so happy with my upgrade from a 5 mega pixel digital camera (yes it's old!). I've always been envious of the high quality shots with the fine resolution and focus in the photos that people take, and now I can finally say that I've joined the pack. Exposing myself into the new world of photography is like learning a completely new language. My head gets confuzzled with all the jargon used in photography and therefore it'll definitely take me a while to try and configure everything. But otherwise, I'm filled with the excitement of becoming a pro shutterbug.
For weeks I have been brainstorming for ideas of what I should bake for chinese new year and in return that nearly made my head explode with the infinite choices that I can decide on. A lot of things did not go into plan on my new year's eve baking bonanza and most of it was due to my lack of organization and foresight. Cheesecakes were originally part of the plan but the refrigerator was jam-packed with groceries which will then be filled with food leftover from new year eve's dinner. Well, I'm not surprised here since history repeats itself every year. It was always a nightmare for me to feed on the same dishes for a whole week as my parents crazily cook more than our stomachs can handle. Luckily, the handbrake was pulled this year and we only have a reasonable amount to deal with.
I had to say that most of the things I baked were decided in a spur of a moment during the day as I was trying to work with what's already in the pantry and what nibbles would be suitable for guests who will come over to celebrate new year with us. My sister, S and I made a batch of honey joys where the majority were shamefully finished by us instead of the guests. The honey joys were nostalgic to have. It's one of those easy-to-make and simply delicious sweet treats that we had to learn to make back in the days of high school.

Cupcakes are always a must in my list to do's for chinese new year as it's simple to serve to guests and this year I decided on making white chocolate raspberry cupcakes. I love the combination of those two flavours together. The natural pinkish-red colour of the raspberry was one of the main reasons chosen as to fit in with the CNY theme. It's definitely no chinese new year treat unless you have some red colour in your desserts...at least in my opinion. These cupcakes are made by simply grabbing a trustworthy plain vanilla cupcake recipe that you have and then just add in white chocolate bits plus a cup of raspberries.
Disasters tend to befall when I'm not organised with anything and same goes with the dark chocolate and cherry brownie tarts. When I started cooking the butter and chocolate, I realised that I ran out of brown sugar. Panic, self-blames and cursing (oops no cursing on CNY) all took place in an instant. But then I decided to take a gamble and use caster sugar instead and luckily the brownies still worked out well. Appearance wise, I realised it probably wasn't the best decision to use cherries as the skin looked old and wrinkly after some harsh exposure in the oven. Otherwise, the texture was smooth and very delicious to eat.

Baking continued to go downhill when I overmixed my macaronage a little where the macarons turned out to be pink rather than red. In my mind I thought this batch had to be thrown away as they looked like flat pancakes when piped out. But these little babies rose to my surprise and actually had 'feet'.

Dark Chocolate and Cherry Brownie Tarts

(recipe adapted from Donna Hay's magazine 10th birthday collector's edition, Issue 59)

200g dark chocolate (70%), chopped
60g butter
½ cup (90g) brown sugar (I used caster sugar instead)
¼ cup (60ml) thickened cream
3 eggs
¼ cup plain flour
250g cherries, pitted and halved

1. Preheat oven to 150°C/130°C fan-forced. Lightly grease 4x10cm-round springform cake tins lined with non-stick baking paper (I used 2x10cm-round cake tins and a 20cm square springform cake tin).

2. Place the chocolate, butter, sugar and cream in a medium saucepan over low heat and stir until melted and smooth.

3. In a separate bowl, whisk the eggs and flour until well combined. Whisk in the chocolate mixture until combined.

4. Pour mixture into the cake tins and top with the cherries. Bake for 35-40 minutes or until the skewer comes out clean. Serve the tarts with chocolate ganache or fresh cherries.

Honey Joys

(recipe adapted from Kellogg's Cornflakes)

90g butter or margarine
⅓ cup sugar
1 tbsp honey
4 cups corn flakes

1. Preheat oven to 150°C. Line a patty pan with paper cases.

2. Melt butter, sugar and honey together in a saucepan until frothy.

3. Add in the corn flakes and mix well.

4. Working quickly, spoon mixture into the paper patty cases. Bake for 10 minutes. Cool before serving.
 

White Chocolate Raspberry Cupcakes

Standard plain cupcake recipe (that makes approx. 20-25 cupcakes)
100g white chocolate, roughly chopped
1 cup raspberries, fresh or frozen, roughly chopped (optional)


Macarons

Please refer to this post for the macaron recipe. Filling was just whipped cream topped with a raspberry. Sorry, I forgot to measure how much cream I've used here.

Monday, 31 December 2012

Fresh Strawberry Cream Cake

 The same strawberry cake again? Yes, I'm afraid so. I've been a pretty selfish baker these days where I've been baking the same things over and over again. The point of this blog is to push me to try something new each time but my selfish desires were stronger this time round. I crave for more strawberry cake and I thought I must let my friends try some of this cake before I move on. This is basically a cake version of the Christmas Hat Strawberry Cupcakes that I've made on my last post.
At the KK christmas party, my friends were a little bit fooled by the appearance of the cake when I told them that this was a strawberry cake. The assumption was mainly based on the strawberry on top of the cake and hence called strawberry cake. And also because the crust on the outside doesn't show its' natural pink hue and so they assumed it was a plain cake base. Well, surprise surprise...it's full of strawberry flavour. Strawberry bang all over. Apparently it's the best cake I've made that they've tasted to date. Selfish baking desires justified right here!

I had plans on making fresh strawberry frosting to accompany the cake but then decided to fall back on using whipped cream. I guess I didn't want to go overboard with the strawberries just in case some people in the group find it a bit too much.
Now you can see the pinkiness of the strawberry cake :)
This cake is quite dense, crumbly and moist. You can have up to four layers of cake from this recipe by dividing the cake batch into 2 to hasten the baking time. As you can only see two layers here and that's because I decorated each cake separately. I know not everyone is a cake monster like me, hehe.

Fresh Strawberry Cream Cake

(adapted from An Edible Mosaic)

2½ cups plain flour
2 ⅛ tsp baking powder
½ tsp salt
⅛ tsp bicarb soda
9 oz hulled fresh strawberries, coarsely chopped (about 2 cups chopped strawberries, lightly packed)
112.5g (½ cup/1 stick) unsalted butter, at room temperature
1½ cups caster sugar
2 large eggs
¼ cup milk (any kind)
2 tsp pure vanilla extract
1 tsp strawberry extract (if available)

1. Preheat oven to 180° C/160°C fan-forced. Grease 2 x 20cm cake tins; line base with baking paper.

2. Whisk together the flour, baking powder, salt, and baking soda in a medium bowl and set aside. Puree the strawberries in a blender or food processor (you will get about 1 1/4 cups of strawberry liquid); set aside.

3. Cream together butter and sugar, then cream in the eggs; mix in the milk, vanilla extract, strawberry extract, and pureed strawberries. Use a wooden spoon to stir the dry ingredients into the wet ingredients all at once, stirring just enough to combine and being careful not to over-mix.

4. Divide and pour the batter into the greased cake tins evenly and bake until a toothpick inserted inside comes out clean, approximately 35 minutes. Cool completely before frosting.

Thursday, 29 November 2012

Lemon Coconut Sour Cream Cake

 Aloha everybody! Summer is approaching as it's constantly sunny in Melbourne. What's not better than having a lemon coconut sour cream cake to celebrate this new-coming season? The cake is moist due to the sour cream, refreshing with the lemony zing and the coconut punch combination all leads to one word in mind: summer! You can tell how much I'm excited for summer.
This cake was in fact baked especially to the man of my life. Happy birthday papa! I really wanted to emulate the look of this cake for ages now and now I've finally filled in another tick-box. For the frosting, I just slightly whipped some thickened cream with some icing sugar where the cream has somewhat thickened in texture than what you started with but still runny enough for it to drip. I don't know how much I've used altogether but I certainly do like the final result!

Lemon Coconut Sour Cream Cake

(adapted from my baking addiction)

1 cup (225g) unsalted butter, softened
1½ cups caster sugar
zest of 3 medium lemons
2 teaspoons vanilla (I used vanillin)
2 eggs
2 cups all-purpose flour
1 teaspoon baking powder
1 teaspoon bicarb soda
1 cup sour cream
½ cup sweetened flaked coconut (I used dessicated coconut)

1. Preheat oven to 180° C/160°C fan-forced. Grease and flour two 10 inch cake pans, set aside.

2. In the bowl of a stand mixer, fitted with the paddle attachment, or with a hand mixer in a large bowl, cream the butter until smooth.

3. In a medium bowl, combine the sugar and lime zest mixing together with your fingertips until the sugar is moistened and fragrant. Add the sugar mixture gradually to the butter and beat on medium speed until light fluffy, about 3 minutes. Mix in vanilla.

4. Add eggs, 1 at a time, beating well after each addition.

5. In a medium bowl, combine flour, baking powder and bicarb soda. Add flour mixture to sugar mixture alternately with sour cream, beating until well blended after each addition. Fold in coconut.

6. Divide the batter evenly between the two prepared pans and smooth the top with a spoon or offset spatula.

7. Bake 50 minutes to 60 minutes or until a toothpick inserted in center comes out clean.

8. Cool for 20 minutes on a wire rack. Invert cake onto wire rack; gently remove pan. Cool completely.


Saturday, 10 November 2012

Celebrations with a Vanilla Butter Birthday Cake

Monday was the celebration of Kris' birthday and I volunteered to bring cake. The week before I asked her what flavour would she like and she happily said vanilla or anything else nice but NOT mango because her family's already getting her a mango cake. Vanilla cake is such a simple and classic dessert that can undergo so many frosting makeovers (or eaten raw) and taste just as great. I've nearly forgotten how fond my memories of vanilla cakes were. One year, I opened the door to welcome my papa home from work and the first thing he said to me was 'Happy Birthday' with a vanilla cake covered entirely with colourful sprinkles. I was completely surprised and delightfully happy.

I've made vanilla cakes a couple of times before but I was still stressed about baking it. Instead of staying in my comfort zone, using the recipes I used to use, I decided to venture out and try a new recipe myself. There was no better person to go to than the vanilla cake guru, Sweetapolita. Gosh she's made so many stunning vanilla cakes that I was blinded by the choices that she's offering. I decided to go with her classic vanilla butter birthday cake as it fits the aim of my baking mission.
One thing that wasn't within my calculations was how much cake I was going to get out of this batter. This recipe could give you 3 individual cakes, and the main point was that I didn't need so many in the first place. I should've read the recipe carefully in the first place. The first time I have to admit that a cake monster like me was feeling so overwhelmed by the amount of cake I get from a recipe.

From reading my previous posts you probably would know that I'm scared of sugary, deadly sweet buttercreams. Normally by looking at a colour-tinged buttercream frosting outside a cake, I would shun away from it as far as I can. Luckily, Sweetapolita has also given me a fruity buttercream recipe that doesn't require any artificial colouring. I love this raspberry buttercream where it gives off the natural pinkish colour and the raspberries mask the deadly sweet flavour of th buttercream. Therefore, I was able to add more icing sugar than usual at ease.
This cake completely suits Kris as she's such a cute and bubbly person with a teenage girl still living inside her. This celebration was rather funny as nobody brought candles along so she had to blow them out with imaginary candles. How dreamy...

Classic Vanilla Butter Birthday Cake with Raspberry Buttercream

(adapted from Sweetapolita)

4 large eggs (separated), at room temperature
3 ½ cups (420g) sifted cake flour*
4 tsp (20g) baking powder
½ (3g) tsp salt
1 cup (227g/2 sticks) unsalted butter, at room temperature
2 cups (400g) granulated sugar, divided
2 tsp (10mL) pure vanilla extract (I used vanillin)
1 cup (250mL) milk, at room temperature
¼ tsp cream of tartar
 
*1 cup of cake flour = (1 cup plain flour - 2tsp) + 2tsp cornflour. Sift mixture 4-5 times till it's fully incorporated with each other.
 
1. Preheat oven to 180° C/160°C fan-forced. Butter and flour three - 8 inch round cake pans. Line bottoms of pans with parchment/baking paper and grease and flour parchment paper.

2. While eggs are still cold, separate them, placing the yolks in one bowl and the whites in another bowl. Cover the two bowls with plastic warp and allow the eggs to come to room temperature before using, about 30 mins.

3. In a medium mixing bowl, sift together the flour, baking powder and salt.

4. In the bowl of an electric mixer, beat the butter until soft (about 1-2 minutes). Add 1½ cups of the sugar and beat until light and fluffy (about 5 minutes).

5. Add egg yolks, one at a time, beating after each addition. Scrape down the sides of the bowl. Add the vanilla and beat until combined.
 
6. With the mixer on low speed, alternately add the flour mixture and milk, in three additions, beginning and ending with the flour.
 
7. In the clean bowl of your electric mixer fitted with the whisk attachment, beat the egg whites until foamy. Add the cream of tartar and continue beating until soft peaks form. Gradually add the remaining ½ cup sugar and continue to beat until stiff peaks form.
 
8. With a rubber spatula gently fold a little of the whites into the batter to lighten it, and then fold in the remaining whites until combined. Do not over-mix the batter or it will deflate.
 
9. Divide the batter evenly between the three prepared pans and smooth the tops with an offset spatula.
 
10. Bake for approximately 25 minutes, or until a toothpick inserted into the centre of the cake comes out clean. Cool the cakes in their pans on a wire rack for 10 minutes. Place a wire rack on top of the cake pan and invert, lifting off the pan gently. Once the cakes are completely cooled, wrap in plastic and place the cake layers in the freezer for at least an hour (to make filling and frosting the cakes easier).
 
Raspberry Buttercream
200g unsalted butter, room temperature
1 cup icing sugar
2 tsp milk
½ tsp vanilla extract (I used vanillin)
pinch of salt
15ml raspberry puree (push through fine mesh to remove seeds)
 
Using an electric mixer, beat the butter till pale and creamy. Add the remaining ingredients except the puree. Mix on low speed for 1 minute to incorporate everything then beat on medium speed for approximately 6 minutes. Add the puree and beat until incorporated.
 
Note: This amount is a bit more than enough to frost one standard 8 inch cake. I sliced the cake in half and frosted the inner layers as well. You might want to double up the amount if you want to frost the whole three layered cake. You may add more icing sugar to get your desired sweetness.
 

Sunday, 4 November 2012

A warm welcome with...Coffee Cream Cake

This weekend has brought me into a big dilemma. The familiarity of my indecisiveness has come back to haunt me as I’m lost upon choosing the right dessert amongst so many choices. My aunt from Singapore has decided to come over to travel around Australia for a month and her first stop is good ol' Melbourne, and she's staying with us of course. I’ve been wracking my brains for ideas of what cake I should bake. What I originally had wanted to bake for the weekend has suddenly been taken over by the stress of my mother telling me what cake to bake clashing with me wanting to bake something extraordinary to impress my aunt. I was a very unhappy. Finally, I decided to take a back a few steps, have some deep breathes and calmed down. I decided to be myself and not focus too much on impressing someone as you can sometimes lose the point by doing so. There's a chinese saying that goes by: "Don't give what you don't like". True. At least I know the bottom line for me is that if I’m not going to be happy, everyone else is most likely going to feel the same as well.
I kept on brainstorming what my aunt would like despite I could've just easily asked my papa that question. Suddenly, Kopi-O came to mind. Kopi-O is the trademark coffee in Singapore and Malaysia which is just the traditional strong black coffee served with sugar. You will always come across a 'Kopitiam' (coffee shop) in every single corner of Singapore because it's just a part of their lifestyle...having a kopi to kickstart the day. Ugh, I dislike coffee. I'm one of those people who don't know how to appreciate coffee because they all taste the same to me (just as bitter). However, I do like the smell of coffee though. Wierd huh?
Despite my ramblings of my distaste for coffee, I do quite like this coffee cream cake of mine. The first time I tried this cake was from a bubbly aunty that I know of and she is an expert on this. I love how soft and delicate the cake is and the coffee cream flavour was acceptable to my degree. There's some elegance about this coffee cream cake that I can't describe properly. Of course, my aunt gave me a thumbs up to this as well.

I decorated this cake on the go and it ended up looking like this...which turned out pretty okay I guess. It took me a while to decided what to put on the top of the cake and here I go into auto-pilot mode again: chocolate. Instead of grating chocolate this time, I used a vegetable peeler to peel off small layers of a milk chocolate block. I like the mini curls that I get out of it. I would suggest that you use a spoon to sprinkle the chocolate shavings on top of the cake instead of using your bare fingers. Your fingers would potentially crush the delicate chocolate curls.
I would totally have no reference as to where this cake originally came from since it was passed down to me in a chinese-whispers-manner. So in this post, I would like to reserve the coffee cream cake recipe. I guess I'll post up the recipe when I do find the recipe or something really similar? In this world where people are frowned upon copying and not acknowledging one's work, I would not want to be one of those. There are so many people out there who don't give a damn about these things. Reminds me of my primary school days where the boy who sat next to me wrote his name on my work once and handed it in as his. Of course, I did not back down and took it on with the teacher. I won.

Sunday, 28 October 2012

Chocolate Chip Raspberry Cheesecake

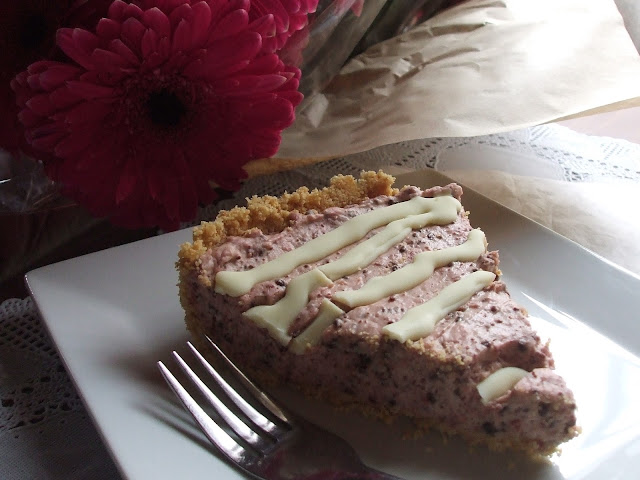
I've been itching to try out this recipe for a while now. The only thing different was that I replaced it with raspberries and drizzled white chocolate on top and here you go Chocolate Chip Raspberry Cheesecake with White Chocolate Drizzles *swoon*. Cherries aren't in season yet in Australia although summer is coming in a month-ish time and I was not going to go out and get myself an expensive batch of cherries. I like recipes that are relatively easy and economical. I mean if you want to compare baking a cheesecake to a standard cake which mainly contains butter, eggs and flour, then of course the cheesecake is more pricey. However, you definitely get more value out of it by baking it yourself rather than buying one from the cake stores.
My mother creeped out when she saw me pulling out the frozen raspberries for baking this cheesecake. She has low tolerance for sour berries especially, but this cheesecake surely did not disappoint her. The sourness of the raspberries compensated for the sweetness of this cheesecake and the white chocolate drizzles on top made it a perfect combination. Insanely delicious. I wouldn't omit the white chocolate for this recipe. Never! I would love to try the original version as well once the cherries are cheaply available in the market.
Baking this cheesecake was the death of me because I did another late night baking session - the ninja style. It was wayyyy past my bedtime by the time I finished baking and cleaning up my mess. Although I could've easily taken my time to bake this cheesecake on the following day, time constraints did not permit me to do so. It is my little sister's sweet 16th birthday and sadly I had to pop into uni on the same day to do some work for my weekly meetings.

My little sister loves her cheesecakes. Actually we all do. My papa once bought a kilo's worth of marie biscuits from Costco just for me to bake a stash of cheesecakes. No I'm not exaggerating here. This cheesecake is a winner, I mean how could you not love the refreshing taste from the raspberries, the tangyness of the cheesecake and the chocolate amongst everything? Less than a quarter was left by the end of the night amongst 7 people. Many went for seconds and one went for a third...
One of the troubles I had with this cake was cutting it and the crumbs would fall apart easily. I should've made more biscuit crumbs for the base on the corner of the tart tin to be more thicker and bake it in the oven for more stability. I placed it in the freezer instead thinking it'll do the same thing...I guess was wrong.

Chocolate Chip Raspberry Cheesecake

(presentation inspired by Eat, Little Bird and recipe adapted from raspberri cupcakes)

2 cups (about 200g) of crushed digestive biscuits (I used arrowroot biscuits)
1 tbsp sugar
100g butter, melted
150g raspberries (fresh or frozen)
1 tbsp sugar
2 tsp lemon juice
1 tbsp cornflour (cornstarch) + 2 tsp cold water
150g finely chopped dark chocolate, or 3/4 cup mini dark choc chips (I blitzed my chocolate in the food processor to make the pieces really tiny)
300g cream cheese, softened
60g (about 1/2 cup) icing sugar, sifted
1 tsp vanilla extract
250ml thickened cream
50g white chocolate

1. Preheat oven to 160°C/140°C fan-forced . Line the base of a 20 to 22cm loose-base flan tin or tart tin with baking paper. Mix crushed biscuits and 1 tbsp sugar together in a medium bowl. Add the melted butter and stir until well combined. Press the mixture into the base of the tin forming an even layer, then using your fingers to gently push the mixture up to the sides of the tin, leaving a sufficiently thick border. Bake the biscuit base for 15–20 minutes. Place the tin on a wire rack and allow it cool completely.

2. Place raspberries, lemon juice and 1 tbsp sugar in a small saucepan. Stir over medium-low heat. Crush the raspberries until they're pureed and stir until the sugar dissolves. Add the cornflour mixture to the saucepan and continue stirring over heat until mixture starts to thicken, then set aside to cool.

3. Using an electric mixer, beat the cream cheese, icing sugar and vanilla at high speed until it becomes smooth and creamy. At low speed, gradually add the finely chopped chocolate and beat until it is evenly distributed. Add the raspberry mixture to the cream cheese filling and stir until combined.

4. In a separate mixing bowl, carefully beat the cream to stiff peaks (keep a close eye on this as the thickened cream is easy to overbeat). Fold cream into the rest of the mixture and then pour over the cooled crust. Chill in the fridge for at least 3 hours or overnight.

5. Melt the white chocolate either in a small bowl over a pan of simmering water or carefully in the microwave. Pour the melted chocolate into a small plastic zip-lock bag, snip off a corner and slowly drizzle the melted chocolate over the cheesecake. Return the cheesecake to the fridge to set for about 15 minutes before serving.