Showing posts with label Chocolate. Show all posts

Monday, 25 February 2013

Devil's Food Raspberry Cupcakes


I had chocolate cravings over the blazing hot weekend. I missed having cake, especially David Lebovit's Devil's Food Cake. This is probably the third time that I've made it and still love the overall texture of the cake. And I always get nice compliments about them.

Devil's Food Raspberry Cupcakes
(adapted from David Lebovitz's Devil's Food Cake Recipe)

9 tbsp unsweetened cocoa powder
1½ cups cake flour (It's not self-raising flour! I used plain flour)
½ tsp salt
1 tsp bicarb soda
¼ tsp baking powder
112.5g (1 stick) unsalted butter, at room temperature
1½ cups caster sugar
2 large eggs, at room temperature
½ cup strong coffee (or water)
½ cup whole or low-fat milk

1. Preheat the oven to 180°C/160°C fan-forced. Grease and flour two 20cm cake pans; line bottoms with circles of baking paper.

2. Sift together the cocoa powder, flour, salt, bicarb soda, and baking powder in a bowl. Using an electric mixer in a large bowl, beat the butter and sugar about 5 minutes until smooth and creamy. Add the eggs one at a time until it's fully incorporated.

3. Mix together the coffee and milk. Stir half of the dry ingredients into the butter mixture, then add the coffee and milk. Finally stir in the other half of the dry ingredients.

4. Divide the batter into the two prepared cake pans and bake for 25 minutes, or until a toothpick inserted into the center comes out clean. Cool completely before frosting.

Makes approximately 30 cupcakes. Store in an airtight container.

Raspberry Buttercream
200g unsalted butter, room temperature
1 cup icing sugar
2 tsp milk
½ tsp vanilla extract (I used vanillin)
pinch of salt
15ml raspberry puree (push through fine mesh to remove seeds)
Using an electric mixer, beat the butter till pale and creamy. Add the remaining ingredients except the puree. Mix on low speed for 1 minute to incorporate everything then beat on medium speed for approximately 6 minutes. Add the puree and beat until incorporated.

Sunday, 25 November 2012

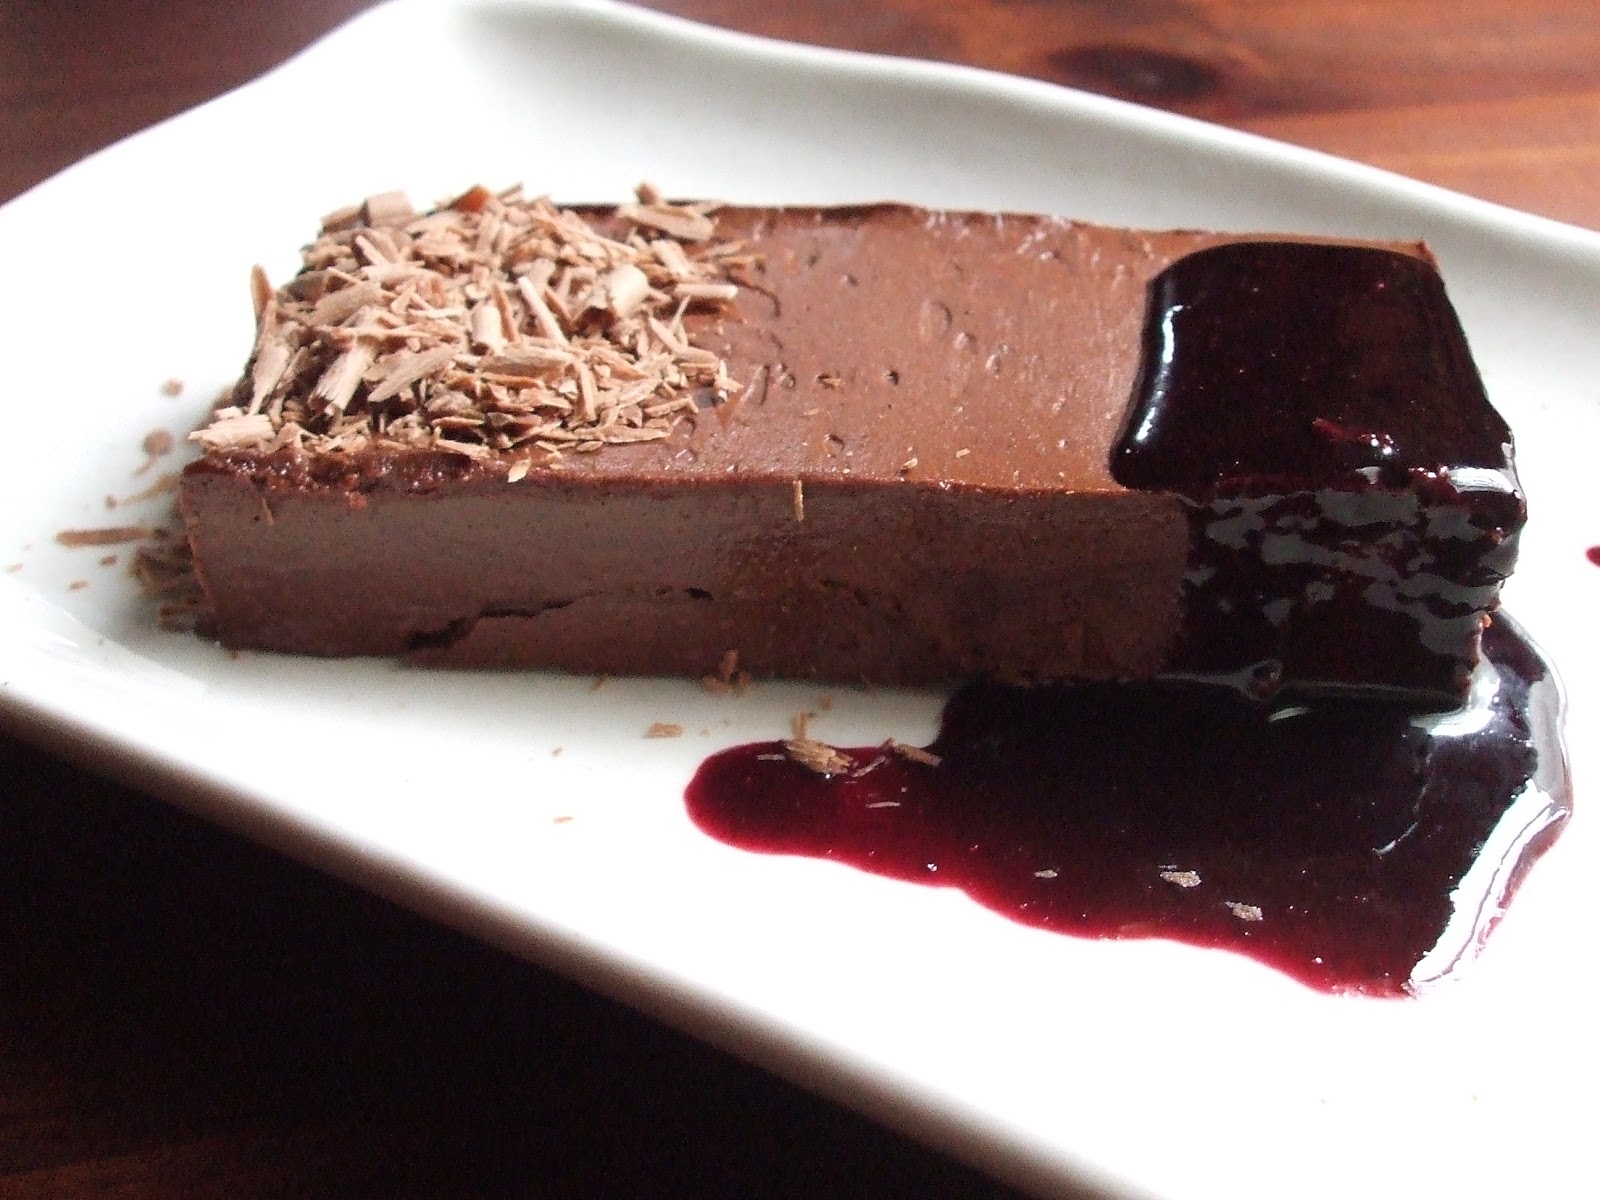
Chocolate Marquise with blueberry compote


Sorry for my lack of blogging lately. A friend/colleague of mine had passed away over the last weekend and most of us who were associated with him were sad, shocked and traumatised by the sudden news. He, who is at the prime of his age where he's dedicated and starting to build up his own career had all of a sudden just left us. For many of us, it took quite a while to process this reality through our heads. It comes back to tell us that life is unpredictable and you don't know what is going to happen in the next minute of your life. This brings me back to what I have said to a group of people once about my perspective on life and the future when I had first experienced torment and grief as a life-changing matter. I said "Do the most as you can whilst you're still alive. Do it now and don't wait because it could be too late for regrets".
With regards to what I've said, it doesn't necessarily mean travelling around the world, spending all your money on luxuries or doing crazy things that doesn't seem reasonable to many people in this world. What I refer to more importantly is spending time with the people that you love. You never know that your last random chat with someone will actually be your ever last conversation. You never know the goodbye you said to someone before you leave each time would actually be the last farewell. Everyone will be occupied with many things in life which makes them busy but I never see that it's impossible to bring out some spare time to see or contact your beloved family and friends, even if it was just for a few minutes. It will happen if you make it happen.

Despite all this, I've got a wedding of a friend coming in a week. There's a big swing in events but it's something I'm happy about and do look forward to in a positive manner. We've grown up with each other and there is so much in common between our families. There are three daughters per family and we're both the eldest. So lately, I've also been trying to put my sugar fixes on hold to have a reasonably okay figure to fit into my dresses. But it seems like this plan has failed miserably as I'm anticipating to get my hands on some chocolate marquise.
Classy, rich, luxurious, sumptuous, duluxe, indulgent are all the words that come to my mind with regards to the name of this dessert. Without a doubt, this chocolate marquise lives up to these words that I've used to describe. It's so rich and dense in texture that one slice served like a chocolate pate is enough to devour your tastebuds in.

This dessert doesn't seem much of a difference to my last post since a chocolate marquise is somewhat similar to a chocolate mousse, but I just couldn't resist. I wouldn't go without a berry compote in combination with this dessert or even at least the addition of fresh of frozen berries will be very welcoming.

Chocolate Marquise with blueberry compote

(Marquise adapted from Drop Dead Gorgeous Daily and compote from raspberri cupcakes)

Chocolate Marquise
250g good quality dark chocolate, finely chopped
175g unsalted butter, softened
75g caster sugar
30g high quality cocoa powder
4 large egg yolks
55 ml water
225 g crème fraiche or whipped cream (I used thickened cream)

Blueberry compote
300g blueberries, fresh or frozen (I used fresh)
¼ cup (55g) sugar
½ tsp vanilla extract (I used vanillin)
Note: You may want to decrease the amount you make for the compote to half or less because the original recipe provides too much for this dessert.

1. In a heatproof bowl, gently melt the chocolate over a saucepan of simmering water. Set aside to cool slightly.

2. Using an electric mixer, beat 130g of butter till slightly fluffy, then mix in half the sugar and cocoa powder until light and fluffy (The mixture should appear to be more pale).

3. In a separate bowl, lightly whip the crème fraiche (or beat the thickened cream till soft peaks form) and set aside.

4. In a clean bowl, combine the remaining butter, sugar, water and egg yolks and place over a saucepan of simmering water. Warm to 70°C and whisk the mixture.

5. Using the electric mixer (with a whisk attachment), whip the egg mixture until light and cool.

6. To combine the marquise, gently fold the chocolate into the butter and cocoa mixture.

7. With a whisk, mix in the egg mixture and lastly fold in the whipped crème fraiche.

8. Place mixture into a prepared dish, smooth top with a palate knife. Cover with clingfilm and set in the fridge for two hours and serve at room temperature. Use a hot knife to cut into slices.

9. Prepare the compote (you may use any berries you want). Place berries, sugar and vanilla in a medium saucepan (if using fresh berries, mash it up first prior to adding the sugar and vanilla). Stir regularly on low-medium heat. Simmer until the sugar completely dissolves and the mixture thickens slightly, about 5-10 minutes. Remove from the heat and strain the skins away if you prefer. Set aside to cool.

Sunday, 11 November 2012

Chocolate Mousse with Raspberry Compote


TGIF! I finally was able to take a deep breathe out of my busy week to meet up, sit down and relax with my high school friends. We haven't had a full house in ages due to everyone's busy schedule from work/studies and it was really sweet to see everyone again...and to have our dosage of gossip of our lives. We went to Tsindos, a Greek family restaurant. The interior design provided a warm family atmosphere catching glimpses of the mediterranean Greece (with my impression of Kalokairi, filmed in Mamma Mia). It was smooth and relaxing to dine in this place as there were guitarists playing Greek songs the whole night to entertain us. Although we couldn't understand a word, the music was soothing to listen to.
To top off the weekend and before I go on a skinny diet, my mind was set to make these chocolate mousse cups accompanied with raspberry compote and fresh blueberries on top. These were amazing. I knew I had to make these when I saw this on Steph's blog. Chocolate mousse or any mousse I should say has always been non-existent in my menu because 9.999999/10 times, I couldn't eat the ones served outdoors. So here's my first official chocolate mousse, and hurrah! I'm not a mousse virgin anymore. It's such an easy thing to make that I can't believe that I didn't make this any earlier! It's rich in chocolate flavour and fluffy in texture. It felt like I was swinging amongst the clouds as I was eating this. This mousse isn't sweet at all because of the dark chocolate with no added sugar. The raspberry compote was a perfect combination with this mousse as I personally find that the mousse might be a bit sickening by itself. I wished I had added more of the compote to each cup because I had leftovers and in my biased opinion, I really liked the compote. This dessert can definitely do with some more sweet fillings, hence I added some fresh blueberries on top.
Hope everyone had a happy weekend. Adios amigos!

Chocolate Mousse with Raspberry Compote

(adapted from raspberri cupcakes)

Raspberry Compote
300g raspberries, fresh or frozen (I used frozen)
¼ cup (55g) sugar
½ tsp vanilla extract (I used vanillin)

Chocolate Mousse
180g good quality dark chocolate, finely chopped
3 large eggs, at room temperature and separated
pinch of salt
225ml thickened cream

1. Prepare the compote first (you may use any berries you want). Place berries, sugar and vanilla in a medium saucepan. Stir regularly on low-medium heat. Simmer until the sugar completely dissolves and the mixture thickens slightly, about 5-10 minutes. Remove from the heat and strain seeds if you prefer. Set aside to cool.

2. For the chocolate mousse, carefully beat thickened cream in a medium-large mixing bowl with an electric mixer till soft peaks form. Place in fridge until ready to use.

3. Place chocolate in a heatproof bowl over a saucepan of gently simmering water and stir until chocolate is completely melted. Remove from the heat and add yolks and salt and stir to combine.

4. Fold whipped cream into mixture. In a separate, medium-large mixing bowl, beat the egg whites with an electric mixer on high speed until soft peaks form. Carefully fold egg whites into chocolate mixture until combined. The mousse should be smooth and even in colour.

5. Spoon about 1 tbsp of cooled berry compote into the bottom of each serving glass. Finish off with a layer of chocolate mousse over the top of the compote. Chill in the refrigerator for 3 hours or until set. Top with more berries or popping candy or fairy floss right before serving.

Sunday, 28 October 2012

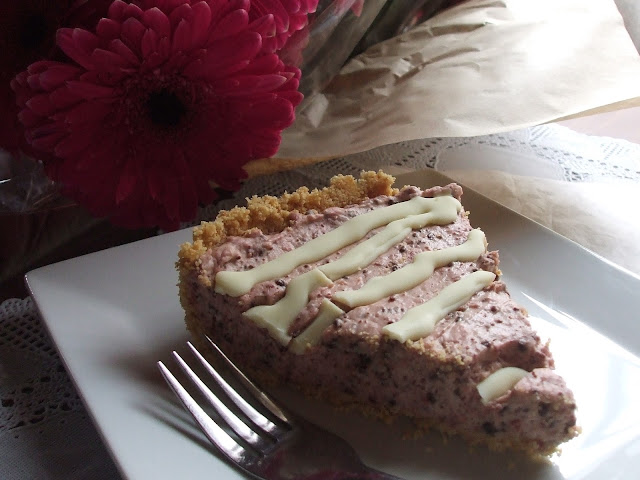
Chocolate Chip Raspberry Cheesecake

I've been itching to try out this recipe for a while now. The only thing different was that I replaced it with raspberries and drizzled white chocolate on top and here you go Chocolate Chip Raspberry Cheesecake with White Chocolate Drizzles *swoon*. Cherries aren't in season yet in Australia although summer is coming in a month-ish time and I was not going to go out and get myself an expensive batch of cherries. I like recipes that are relatively easy and economical. I mean if you want to compare baking a cheesecake to a standard cake which mainly contains butter, eggs and flour, then of course the cheesecake is more pricey. However, you definitely get more value out of it by baking it yourself rather than buying one from the cake stores.
My mother creeped out when she saw me pulling out the frozen raspberries for baking this cheesecake. She has low tolerance for sour berries especially, but this cheesecake surely did not disappoint her. The sourness of the raspberries compensated for the sweetness of this cheesecake and the white chocolate drizzles on top made it a perfect combination. Insanely delicious. I wouldn't omit the white chocolate for this recipe. Never! I would love to try the original version as well once the cherries are cheaply available in the market.
Baking this cheesecake was the death of me because I did another late night baking session - the ninja style. It was wayyyy past my bedtime by the time I finished baking and cleaning up my mess. Although I could've easily taken my time to bake this cheesecake on the following day, time constraints did not permit me to do so. It is my little sister's sweet 16th birthday and sadly I had to pop into uni on the same day to do some work for my weekly meetings.

My little sister loves her cheesecakes. Actually we all do. My papa once bought a kilo's worth of marie biscuits from Costco just for me to bake a stash of cheesecakes. No I'm not exaggerating here. This cheesecake is a winner, I mean how could you not love the refreshing taste from the raspberries, the tangyness of the cheesecake and the chocolate amongst everything? Less than a quarter was left by the end of the night amongst 7 people. Many went for seconds and one went for a third...
One of the troubles I had with this cake was cutting it and the crumbs would fall apart easily. I should've made more biscuit crumbs for the base on the corner of the tart tin to be more thicker and bake it in the oven for more stability. I placed it in the freezer instead thinking it'll do the same thing...I guess was wrong.

Chocolate Chip Raspberry Cheesecake

(presentation inspired by Eat, Little Bird and recipe adapted from raspberri cupcakes)

2 cups (about 200g) of crushed digestive biscuits (I used arrowroot biscuits)
1 tbsp sugar
100g butter, melted
150g raspberries (fresh or frozen)
1 tbsp sugar
2 tsp lemon juice
1 tbsp cornflour (cornstarch) + 2 tsp cold water
150g finely chopped dark chocolate, or 3/4 cup mini dark choc chips (I blitzed my chocolate in the food processor to make the pieces really tiny)
300g cream cheese, softened
60g (about 1/2 cup) icing sugar, sifted
1 tsp vanilla extract
250ml thickened cream
50g white chocolate

1. Preheat oven to 160°C/140°C fan-forced . Line the base of a 20 to 22cm loose-base flan tin or tart tin with baking paper. Mix crushed biscuits and 1 tbsp sugar together in a medium bowl. Add the melted butter and stir until well combined. Press the mixture into the base of the tin forming an even layer, then using your fingers to gently push the mixture up to the sides of the tin, leaving a sufficiently thick border. Bake the biscuit base for 15–20 minutes. Place the tin on a wire rack and allow it cool completely.

2. Place raspberries, lemon juice and 1 tbsp sugar in a small saucepan. Stir over medium-low heat. Crush the raspberries until they're pureed and stir until the sugar dissolves. Add the cornflour mixture to the saucepan and continue stirring over heat until mixture starts to thicken, then set aside to cool.

3. Using an electric mixer, beat the cream cheese, icing sugar and vanilla at high speed until it becomes smooth and creamy. At low speed, gradually add the finely chopped chocolate and beat until it is evenly distributed. Add the raspberry mixture to the cream cheese filling and stir until combined.

4. In a separate mixing bowl, carefully beat the cream to stiff peaks (keep a close eye on this as the thickened cream is easy to overbeat). Fold cream into the rest of the mixture and then pour over the cooled crust. Chill in the fridge for at least 3 hours or overnight.

5. Melt the white chocolate either in a small bowl over a pan of simmering water or carefully in the microwave. Pour the melted chocolate into a small plastic zip-lock bag, snip off a corner and slowly drizzle the melted chocolate over the cheesecake. Return the cheesecake to the fridge to set for about 15 minutes before serving.

Sunday, 21 October 2012

Devil's Food Raspberry Layer Cake

This post is a special one as I'd like to dedicate it to my brother (cousin). Happy birthday! Although we are oceans apart, your presence is still muchly missed. I would sometimes address older guys that I know as ‘brother’ out of politeness (as it’s common in our Asian culture to do so) but I’ve always naturally called him brother since a little girl. I never call someone 'brother' as effortlessly as I do with him. We may have only seen each other no more than 10 times in our life, but we would always hit off when we see each other. I miss our casual stroll down to the park on a nice sunset evening, sitting on the swings and talking mindlessly about anything that comes to mind. I felt safe and secure during those timeless moments. I also miss the deep and meaningful conversations that we had which could've possibly lasted till 5am in the morning if our parents didn't nag us to get some sleep.
I was inspired to do this cake when I stumbled upon it on Gourmet Traveller. Despite how amazing it looks, the recipe looked overwhelming and impractical due to my diet restrictions. I can't imagine cutting a slice from an 8-layered cake, although I'm confident that I could finish a slice myself, hehe. In my mind I was imagining how the layers will fall apart as I'm cutting it and that would be my worst nightmare. So then, I thought I'd come up with my own smaller version of that chocolate raspberry layer cake.
I was tempted to try David Lebovitz's recipe for the first time. What not better to start off with his Devil's Food Cake that is full of chocolatey goodness. The cake is smooth and delicate in texture and is not overbearingly sweet in taste. However, I guess I could've used milk chocolate ganache or even buttercream instead of dark chocolate ganache to marry the sourness of the raspberries since the cake is not that sweet to begin with.
There are so many things that I wished I could've done differently to the assembly of this cake. The first mini kitchen disaster was leaving the cake a little bit longer in the oven as I didn't hear the alarm ringing the second time round. It certainly would not do any justice to a cake that's meant to be moist in the first place. The next few events didn't go as well as I had planned. I probably shouldn't have made a 4-layered cake but just keep the 2 layers of cake as it is and have one generous slab of whipped cream in between. Next the frozen raspberries starts dripping out on the cream as they thaw. Lastly, the chocolate ganache on top drooped down in quite an ugly way. It wasn't even meant to droop down in the first place. Gahhh what could get worse here on.
Well, given that my brother is not around to see me hang my head in shame on the appearance of this cake, I do however have one last message for him: "Please come back to Australia again! Although it should be my shot to come visit you overseas this time round" =P

Devil's Food Raspberry Layer Cake

(adapted from David Lebovitz's Devil's Food Cake Recipe)

9 tbsp unsweetened cocoa powder
1½ cups cake flour (It's not self-raising flour! I used plain flour)
½ tsp salt
1 tsp bicarb soda
¼ tsp baking powder
112.5g (1 stick) unsalted butter, at room temperature
1½ cups caster sugar
2 large eggs, at room temperature
½ cup strong coffee (or water)
½ cup whole or low-fat milk
Optional: 1-2 punnets of raspberries

1. Preheat the oven to 180°C/160°C fan-forced. Grease and flour two 20cm cake pans; line bottoms with circles of baking paper.

2. Sift together the cocoa powder, flour, salt, bicarb soda, and baking powder in a bowl. Using an electric mixer in a large bowl, beat the butter and sugar about 5 minutes until smooth and creamy. Add the eggs one at a time until it's fully incorporated.

3. Mix together the coffee and milk. Stir half of the dry ingredients into the butter mixture, then add the coffee and milk. Finally stir in the other half of the dry ingredients.

4. Divide the batter into the two prepared cake pans and bake for 25 minutes, or until a toothpick inserted into the center comes out clean. Cool completely before frosting.

Dark Chocolate Ganache
Please refer to the original recipe if you want to cover the whole entire cake with ganache.

100g dark chocolate, finely chopped
¼ cup water (or cream)
50g unsalted butter, chopped

In a mini saucepan, bring the water to boil with small-medium heat. Add in the chopped chocolate to the water, stirring occasionally till it's completely melted. Remove the saucepan from heat and add in the butter. Whisk them into the chocolate until completely melted and smooth in texture. Cool ganache at room temperature for approx. 1 hr or wrap up with cling wrap and leave in the fridge to set.

Whipped Cream
300g thickened cream
1 tbsp icing sugar

Beat the thickened cream with electric mixer for approx. 2mins and then add in the icing sugar. Continue to beat the cream until stiff peaks start forming.

Assembling the cake
For both of the cakes, slice them horizontally across into two equal parts to get 4 layers (you may want to trim the tops off a bit if you want straight even layers). Crumb coat the first layer of cake with cream, then cover the cake with some more cream, smoothing out with an offset spatula. Distribute some raspberries on top. Add the next layer of cake on top. Repeat the same steps for the second and third layer of cake. The cream should be fully used up by the third layer. For the fourth layer of cake, spread the dark chocolate ganache on top using an offset spatula and top up with some raspberries.

Serve immediately. Store in an air-tight container at room temperature and keep it away from sunlight.

Sunday, 14 October 2012

Chocolate Fudge Brownies


TGIF: I wasn’t feeling too well. My head felt drowsy and heavy. My arms and legs felt tingly. The weather was crap with the sky coloured grey and accompanied by rain. On top of everything, I was tired and it took me more effort listening to people talking and to register all the information. But there was a concert that I’ve booked months in advance to attend. Was I going to give up so easily on my first ever concert to go and see Maroon 5? Hell no.
First time experiences always leave the biggest impression. For the first time, I went crazy like everyone else. Waiting with excitement, constantly smiling for no reason like a smitten fan girl, screaming louder and louder through each song, waving my hands as Adam Levine instructs, standing and grooving to the songs I loved, clapping my hands till it got numb, clicking away with numerous snapshots until my camera nearly went out of battery and getting deafened from all the screams and whistles. Adam Levine and the rest of Maroon 5 delivered such an outstanding performance. It was more than a sensation to listen to the live shows than watching it on-screen. On a stage with no airy-fairy props but just raw talent, sexiness and humour ;)

I was impressed by how I managed to survive through the whole night but more interestingly, I was surprised by the girl who sat behind me. She was asleep throughout the whole performance. I was struck in awe of how she still managed to sleep through that level of noise.
These chocolate fudge brownies are just as sexy as Adam Levine. The gush of aroma coming out of the oven was already irresistible. It was hard...to not reach out to the oven. Desires were strong but these brownies are best to be sliced and eaten once completely cool. Oh gosh, how was I supposed to wait?! Even my papa wanted a slice straightaway as well.

I started having doubts about this recipe when the first bite I took was quite bitter. It wouldn't be too surprising since they were chock loads of dark chocolate in this recipe. But then I realised the flavour didn't mature until the next day. That was when the true texture and flavour of a brownie came about. So I would suggest that you bake brownies a day in advance...but who really does that these days? 

I've never really eaten brownies. Even when I used to work at Mrs. Fields, I never bothered trying their brownies for which they're popular for although it was within my reach the whole entire time. Even the times when my lady boss had me to take some home, I gave it all to my family. Now I look back, I tend to ask what was wrong with me back then? I know this sounds wierd, but I don't normally eat or buy things from the place I work at (although it's free or discounted) unless I really needed it. I guess I just like to keep work and personal life completely separate from each other.

Chocolate Fudge Brownies

(adapted from Women's Weekly MIX)

150g butter, chopped
300g dark eating chocolate, finely chopped
1½ cups firmly packed brown sugar
3 eggs, lightly beaten with a fork in a small bowl
1 tsp vanilla extract
3/4 cup plain flour
3/4 cup dark Choc Bits or chocolate chips
½ cup (120g) sour cream
3/4 cup roasted macadamias, chopped coarsely (I used ½ cup almonds instead since I didn't have macadamias)

1. Preheat oven to 180°C/160°C fan-forced. Grease 19cm x 29cm slice pan. Line base with baking paper, extending paper 5cm over long sides.

2. Stir butter and dark chocolate in medium-large saucepan over low heat until smooth. Cool 10mins.

3. Stir in sugar, eggs and vanilla extract into chocolate mixture, then sifted flour, Choc Bits, sour cream and nuts. Spread mixture into pan.

4. Bake brownies for 40 minutes. Cover pan with foil; bake for further 20 minutes. Cool in pan before cutting.

Monday, 20 August 2012

Purple Ombre Chocolate Sprinkles Cake


Today is a special day for someone very special to me. It is my mother's birthday. Happy birthday mummy! You've just passed the 1st year of half a century of your life and you still look as beautiful and forever young from the first day I laid my eyes on you.

My mother never really tends to remember her own birthday in most cases and I guess that really worked in my favour this time as she probably thought that I was just baking another random cake to eat yet again. Family photos were nonetheless taken (with our funky pyjama's) and a cheery birthday song dedicated to her with my little sister playing the music on the piano. A moment that I've always dreamt of has all come to reality today.

For 2 weeks I've been pondering about what type of cake I should bake for my mother and until I came across Steph's blog with her purple ombre sprinkles cake, I knew that was the cake I should bake since purple is my mother's favourite colour. It's so amazing from the moment when you cut the first slice of cake out and see the awesome gradient of colours within. Pleasant! I had a few worries baking this cake. It is my first time making it and I was worried with the amount of layers I had to make as well as assembling them neatly where I'm not too good at when it comes to dealing with multiple layers of cake. Given all these factors, I still didn't take the initiative to bake as early as possible.


Oh dear! My papa's fuzzy hand in the background. They were telling me to hurry up with taking photos >.<
Yesterday was quite an eventful day, my friends and I decided to go for some classy High Tea down at The Westin Melbourne. The High Tea had a more casual set up without the tables and chairs, instead we sat on couches surrounded by mini tables but it still had some edgy class amongst all that. It was a shame that we didn't get the reserved spot close to the fireplace. What was worst was that I forgot to bring my camera out to take photos for this special occasion *bangs head on the wall*. So then, I had to rely on my friends fancy SLR camera ;) Coffee, tea and hot chocolate was unlimited so as a typical asian, I made the most of it and yes I paid the price of going to the toilet so many times afterwards!

So many events occured this weekend! The Manifest was on and we came across so many people cosplaying as anime characters. Another reason to bang my head for not bringing out a camera. I even bumped into two of my favourite ex-colleagues during our post-High Tea shopping spree at Daiso (OMG! I love DAISO so much) as well as my friend R, for which I haven't seen in a while.

As I got home I lazed around for 'a bit' and then started baking. Knowing how slow I would get with baking anything for the first time, I started baking around 9pm. I know, not the brightest choice of all and by the time I finished it was already midnight! This is not the first time that I've baked till wee hours.

Decoration all took place in the next day. It is my first time making chocolate molds and chocolate roses and I guess it looks quite okay for a beginner who just learnt it in 5mins! I kept on telling myself throughout last week to start learning how to make chocolate roses before today but I guess my laziness got the better out of me. Chocolate sprinkles were a b**** to handle. I nearly grated my skin along with the chocolate that I was grating but luckily only part of my nail was chipped. Sprinkling the chocolate around the cake was a total mess. It took me forever to get as many as I can onto the cake without it looking like some piece of dirt splattered over parts of the cake.

I've layered this cake alternately with strawberry jam and buttercream, and the whole cake covered with cream. Buttercream has always scared me due to how sweet it is, especially with the amount of icing sugar you have to use, but I thought I'd be a little more obedient this time and stick to the entire recipe. It was bloody sweet! I don't think my liver will be able to handle this. Luckily it wasn't entirely covered with buttercream (as I only made half of the suggested amount to start off with) or else I wouldn't have been able to finish a slice. I guess I'll just stick with the cream the next time I bake it again...if I ever do.

Purple Ombre Chocolate Sprinkles Cake

(adapted from Raspberri Cupcakes) - makes one-round 18cm 5 layered cake

Cake:
2 3/4 cups (355g) plain flour
1 tbsp baking powder
1/2 tsp salt
225ml milk
2 tsp vanilla extract (I use Imitation Vanilla, since vanilla extract/essence is derived from alcohol)
1 3/4 cups (400g) caster sugar
225g unsalted butter, softened
4 eggs
Purple food colouring (I mixed blue and pink colouring together, approx 1:3 ratio)

Inner Layer:
Strawberry jam
Buttercream Frosting: 250g icing sugar (sifted) and 137.5g salted butter

Outer Layer (Whipped Cream):
300g thickened cream
1 tbsp icing sugar

Modelling Chocolate (enough for 2 roses):
75g milk chocolate chips
62.5g glucose syrup


Cake:
1. Preheat oven to 180°C and grease 18cm round cake tins (I had 2 to work with luckily). Line the base with baking paper.

2. Combine flour, baking powder and salt in a medium bowl and set aside. Mix milk and vanila in a measuring jug.

3. Using an electric mixer on low speed, beat the sugar and butter in a large bowl until blended. Increase to high speed and beat for approx 2min or until pale and creamy. Reduce speed to medium-low and add eggs 1 at a time, mix well.

4. Alternately add the flour and milk mixture, beginning and ending with the flour mixture (Add 1/4 of flour mixture and 1/3 of milk each time). Beat until smooth, occasionally scraping the bowl with a spatula. Divide the mixture evenly into 5 bowls (approx. 300g per bowl).

5. Leave one bowl of batter white, then gradually add colouring to each bowl. Gently fold into the mixture, adding slightly more colouring as you do to each bowl to give you an even gradient of colour.

6. Pour batter into cake tin and bake each layer about 15-20 min. Cool the cake in tin for 5min then transfer the cake onto a wire rack to cool.

Buttercream Icing:
Chop the butter into small cubes and leave it sitting on the bench for approx. 30min before beating it (I tend to cheat by microwaving it for a few seconds). Beat the butter at high speed, until smooth and fluffy. Reduce speed to medium-low and gradually add the icing sugar until combined, then increase the speed to high and beat until pale and fluffy.

Whipped Cream:
Using an electric mixer, beat the cream at high speed until the cream has become slightly more thickened in texture. Add in the icing sugar and beat at medium-low speed until stiff peaks start forming.

Modelling Chocolate (adapted from The Cake Makery)
Microwave the chocolate chips for approx. 1min or until completely melted. Using a rubber spatula, stir the melted chocolate to make sure it's completely melted without any lumps left behind and scrape the chocolate off from the edges of the bowl. Fold in the glucose in a circular motion with your spatula ending up in the middle of the mixture. Allow the mixture to cool. Wrap up the mixture in cling wrap if you're not using it straightaway and leave it at room temperature. Knead well before you use it! If the chocolate is too hard to work with, place it back in the microwave for 5-10secs and it should be easier to work with.

How to make the chocolate roses please refer go here.

Assembling the cake:
You may need to trim the tops of the cake to make them level (but I was too lazy to do that). Spread the first layer of cake with jam and then the next layer with buttercream, alternately. Cover the whole cake with the whipped cream, smoothing it out with an offset spatula. If you're decorating with chocolate sprinkles, it will be messy. My cake was on the wire rack and I had a plate under the rack to catch all the remaining spinkles that wouldn't stick to the cake. Stick your chocolate roses on top of the cake once you're done and carefully transfer the cake onto a cake stand and serve at room temperature.