Showing posts with label Cheesecake. Show all posts

Tuesday, 2 July 2013

Sticky Date Cheesecake with Caramel Fudge Sauce

If you love cheesecake and sticky date pudding, this is a cake that you must try!

This recipe caught me by the eye the first time when I curiously laid my eyes at the packaging of a cream cheese at my local supermarket. Within my heart, I knew from then on that I would definitely bake it one day. This sticky date cheesecake is super delicious. If you have a sweet tooth, this is definitely the cake for you. However, I tend to see a bipolar response from friends and family with regards to the caramel fudge sauce. Ones who love it can literally drink the sauce by itself ( I do mean it literally!) and ones who don't like their desserts being too sweet will draw back and ascend the white flag. I personally like to have a slice with some drizzles of caramel fudge sauce on top, as illustrated in the photos. If your family is not a big caramel fan to begin with (like mine) then I recommend you to halve the amount as suggested. I made three-quarters of the amount and it was still too much that it had to go to waste in the end. On the contrary, I had wished that if only this recipe was able to give me a bigger cake instead of a loaf-sized one instead. But nonetheless, I know this would not be the last time that I'll be baking it.

Sticky Date Cheesecake

(adapted from Kraft Philadelphia Cream Cheese)

100g butternut snap biscuits, crushed (I used 150g arrowroot biscuits instead...I like my crust thick)
20g unsalted butter melted (I used 50g instead)
375g Original Philadelphia Cream Cheese, softened
1/3 cup caster sugar
1 teaspoon vanilla
1 large egg
2 teaspoons plain flour
5 (125g) fresh dates, chopped

1. Preheat the oven to 160°C/140°C fan-forced. Grease a 9cm x 20cm loaf tin and line with baking paper.

2. Make the crust first by combining crushed biscuits and melted butter in a bowl. Press into the base of lined cake tin. Chill in refrigerator until the cheesecake mixture is ready.

3. Beat the cream cheese, sugar and vanilla with an electric mixer until smooth. Beat in the egg until well incorporated, then stir in the flour and dates with a spatula.

4. Pour the cheesecake mixture on top of the crust and bake for 25 minutes or until just set. Cool in the oven with the door ajar for at least 30 minutes and then transfer into the refrigerator to chill for at least 4 hours or overnight.

Caramel Fudge Sauce
(Make this on the day when serving)

1 cup of brown sugar, firmly packed
80g butter, chopped
1/3 cup cream
Optional: Cream, extra to serve.

In a small saucepan, combine the brown sugar, butter and cream and stir over low heat for 5 minutes until mixture has thickened. Serve immediately with a slice of cheesecake.


Disclaimer: This blog post is based on my personal and honest opinion about this recipe published with permission but has no relation to Mondelez Australia.

Friday, 22 March 2013

Classic Baked Cheesecake with Blueberry Sauce

Hold back your salivas ladies and gentlemen! Here comes a drool-worthy cheesecake drizzled over with some amazing blueberry sauce. I actually cannot believe that I haven't made a post on this yet.

This is the cake that changed my life.
The one that made me believe that I can actually bake as I previously had little faith in myself.
The one that made me fall in love with baking.
The one that is so simple to bake.
The one that is revered deeply in my heart.
And the one that has become my 'signature' cake that friends and family remember me for.
 
Recently, our household accommodated a lovely couple from overseas. The uncle and aunty were such a cute pair together. Since it was auntie's first time in Australia, I thought why not welcome her with my 'signature' cheesecake...and oh gosh, she loved it. Love to the point that she proactively seeked for the recipe and got me to explain in detail of how to bake it. For the first time, I had to translate a recipe in chinese for someone... and that part was a little bit daunting for me since my vocabulary is quite limited.
The blueberry sauce definitely deserves a mention as well. It's so good that it's not just an accessory to the cheesecake but a wedded partner. It's got the naturally berry sweetness with a bit of tangy flavour from the lemons. Beautiful combination. Now I'm craving pancakes just as an excuse to have more of that blueberry sauce.

Classic Baked Cheesecake with Blueberry Sauce

(cheesecake recipe adapted from Arnotts)

Biscuit base
250g plain biscuits, finely crushed (Marie, Nice, Arrowroot etc)
125g unsalted butter, melted
1 tsp ground cinnamon (optional)

Cheesecake
500g cream cheese, softened
1/2 cup sugar
1 tsp vanilla essence (I used Vanillin)
3 eggs

1. Preheat the oven to 150°C/130°C fan-forced. Lightly grease a 20cm springform tin or line the cake tin with baking paper (if you don't have a springform tin).

2. In a bowl, combine crushed biscuits, cinnamon and melted butter. Press firmly onto base and 3/4 of the way up the sides of the cake tin. Refridgerate for 30mins or until the cheesecake batter is ready.

3. Using an electric mixer, beat cream cheese, sugar and vanilla until smooth.

4. Add eggs one at a time, beating well after each addition until combined. Pour into biscuit base. Bake for 50 minutes.

5. Once baked, turn off the oven. Leave cheesecake in the oven with the door ajar for 1 hour.

6. Chill in the refrigerator for 4 hours or overnight.

Homemade Blueberry Sauce

(recipe adapted from My Baking Addiction)

2 cups (250g) fresh or frozen blueberries
1/2 cup water
1/2 cup sugar
2 tbsp lemon juice
2 tbsp cornstarch, mixed with 2 tbsp cold water
1/2 tsp vanilla extract (I used Vanillin)
Zest of 1 lemon (approx. 1 tbsp)

1. In a small saucepan over medium heat, combine blueberries, 1/2 cup water, sugar and lemon juice. Stir frequently and bring to low boil.

2. In a small bowl, mix cornstarch with cold water. Slowly stir the cornstarch into the blueberries, taking care not to crush the blueberries. Stir until the sauce is thick enough to coat the back of a metal spoon, about 5 minutes.

3. Remove from heat and gently stir in the vanilla and zest. If the sauce is too thick for you, slowly add in water until you've reached desired consistency.

Sunday, 28 October 2012

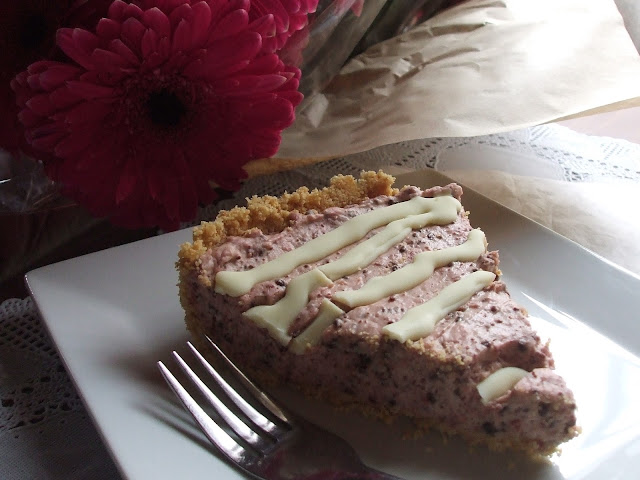
Chocolate Chip Raspberry Cheesecake

I've been itching to try out this recipe for a while now. The only thing different was that I replaced it with raspberries and drizzled white chocolate on top and here you go Chocolate Chip Raspberry Cheesecake with White Chocolate Drizzles *swoon*. Cherries aren't in season yet in Australia although summer is coming in a month-ish time and I was not going to go out and get myself an expensive batch of cherries. I like recipes that are relatively easy and economical. I mean if you want to compare baking a cheesecake to a standard cake which mainly contains butter, eggs and flour, then of course the cheesecake is more pricey. However, you definitely get more value out of it by baking it yourself rather than buying one from the cake stores.
My mother creeped out when she saw me pulling out the frozen raspberries for baking this cheesecake. She has low tolerance for sour berries especially, but this cheesecake surely did not disappoint her. The sourness of the raspberries compensated for the sweetness of this cheesecake and the white chocolate drizzles on top made it a perfect combination. Insanely delicious. I wouldn't omit the white chocolate for this recipe. Never! I would love to try the original version as well once the cherries are cheaply available in the market.
Baking this cheesecake was the death of me because I did another late night baking session - the ninja style. It was wayyyy past my bedtime by the time I finished baking and cleaning up my mess. Although I could've easily taken my time to bake this cheesecake on the following day, time constraints did not permit me to do so. It is my little sister's sweet 16th birthday and sadly I had to pop into uni on the same day to do some work for my weekly meetings.

My little sister loves her cheesecakes. Actually we all do. My papa once bought a kilo's worth of marie biscuits from Costco just for me to bake a stash of cheesecakes. No I'm not exaggerating here. This cheesecake is a winner, I mean how could you not love the refreshing taste from the raspberries, the tangyness of the cheesecake and the chocolate amongst everything? Less than a quarter was left by the end of the night amongst 7 people. Many went for seconds and one went for a third...
One of the troubles I had with this cake was cutting it and the crumbs would fall apart easily. I should've made more biscuit crumbs for the base on the corner of the tart tin to be more thicker and bake it in the oven for more stability. I placed it in the freezer instead thinking it'll do the same thing...I guess was wrong.

Chocolate Chip Raspberry Cheesecake

(presentation inspired by Eat, Little Bird and recipe adapted from raspberri cupcakes)

2 cups (about 200g) of crushed digestive biscuits (I used arrowroot biscuits)
1 tbsp sugar
100g butter, melted
150g raspberries (fresh or frozen)
1 tbsp sugar
2 tsp lemon juice
1 tbsp cornflour (cornstarch) + 2 tsp cold water
150g finely chopped dark chocolate, or 3/4 cup mini dark choc chips (I blitzed my chocolate in the food processor to make the pieces really tiny)
300g cream cheese, softened
60g (about 1/2 cup) icing sugar, sifted
1 tsp vanilla extract
250ml thickened cream
50g white chocolate

1. Preheat oven to 160°C/140°C fan-forced . Line the base of a 20 to 22cm loose-base flan tin or tart tin with baking paper. Mix crushed biscuits and 1 tbsp sugar together in a medium bowl. Add the melted butter and stir until well combined. Press the mixture into the base of the tin forming an even layer, then using your fingers to gently push the mixture up to the sides of the tin, leaving a sufficiently thick border. Bake the biscuit base for 15–20 minutes. Place the tin on a wire rack and allow it cool completely.

2. Place raspberries, lemon juice and 1 tbsp sugar in a small saucepan. Stir over medium-low heat. Crush the raspberries until they're pureed and stir until the sugar dissolves. Add the cornflour mixture to the saucepan and continue stirring over heat until mixture starts to thicken, then set aside to cool.

3. Using an electric mixer, beat the cream cheese, icing sugar and vanilla at high speed until it becomes smooth and creamy. At low speed, gradually add the finely chopped chocolate and beat until it is evenly distributed. Add the raspberry mixture to the cream cheese filling and stir until combined.

4. In a separate mixing bowl, carefully beat the cream to stiff peaks (keep a close eye on this as the thickened cream is easy to overbeat). Fold cream into the rest of the mixture and then pour over the cooled crust. Chill in the fridge for at least 3 hours or overnight.

5. Melt the white chocolate either in a small bowl over a pan of simmering water or carefully in the microwave. Pour the melted chocolate into a small plastic zip-lock bag, snip off a corner and slowly drizzle the melted chocolate over the cheesecake. Return the cheesecake to the fridge to set for about 15 minutes before serving.

Sunday, 2 September 2012

No-Bake Lemon Cheesecake

Firstly, I'd like to take this opportunity to wish my papa a Happy Father's Day as well as to all the awesome father's out there! I've been meaning to come up with a 3 day baking marathon for father's day but I guess it was out of my league since I've got plenty of other important work-related stuff to do before Monday. I baked the banana cake mini's as my first instalment, knowing that my dad (and everyone else in my family) likes bananas...and not to mention that I had requests for an encore to bake the banana cake again, hehe. On the next day, I decided to make something rather simple that my dad had recently expressed his likings to, the No-bake Lemon Cheesecake. My sisters love it as well but on the contrary, mum and I personally prefer the classical baked cheesecake that I've always made in the past. I guess it's because the both of us cringe at the sour taste in desserts, although the cake is not explicitly sour. Mum and I are one of a kind where we've always had a sweet tooth and have minimal love for sour foods. Most of our dishes at home barely incorporate any sourness, only sometimes. I know certain people can eat a lemon or a grapefruit as it is (accompanied by salt or sugar at times) but I have low tolerance for it. You'll see me squirming and screeching when I eat something sour.

This cake doesn't take too long to bake which sort of makes me feel guilty about the amount of effort I've put into this special occasion. Originally, I wanted to decorate the cake to make it look a little more 'manly'...if there is such a word to describe a cake. Unfortunately, it turned out looking rather feminine and girly. I can't help it, Spring has just arrived and oooh! look at that lovely sunshine. I'm inspired to make something more light and vibrant to suit this season which turned out like...this. Sorry papa, you do live in a household that is dominated by women afterall...it's 4 against 1, heehaw.

For people who don't have an oven or that it is broken and waiting for it to be fixed, you don't need to be deprived from having cake as you only need to refridgerate it. Saves a lot of gas and electricity on your bill as well, haha.

No-Bake Lemon Cheesecake


125g unsalted butter, melted
Arrowroot biscuits, need approx. 20 biscuits (Marie or Nice biscuits may be used in place of arrowroot), finely crushed
500g cream cheese, softened
2 tsp vanilla essence (I use Imitation Vanilla)
1/3 cup lemon juice
a tin of condensed milk (395g)
Optional: zest of 1 lemon


1. Line the base of a 20cm springform cake tin with baking paper.

2. Make the biscuit base. In a bowl, combine the biscuit and butter and mix well with a spoon. Press firmly onto the base of the cake tin and refrigerate for approx. 30min. You may sprinkle in some caster sugar into the biscuit mix if you want to emulate the 'Nice' biscuit.

3. In a large bowl, using an electric mixer at medium speed, beat the cream cheese and vanilla until smooth.

4. Gradually add condensed milk and lemon and beat until smooth. I start off with 1/3 of condensed milk, then half of lemon juice and then repeat.

5. Pour the batter onto the biscuit base and refrigerate for 3-4 hours or leave overnight. Remove from tin and serve.


Tips:
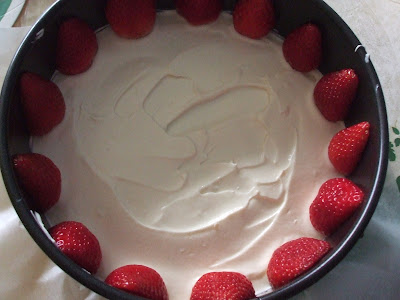
If you want to incorporate strawberries like what I've done, first of all, make sure they're all in similar height and not too tall or else you have strawberries poking out of your cheesecake. Strawberries ideally 3-4cm in height, approximately (or shorter). Cut the strawberries in half and line them up in the cake tin (as shown below) with equal distances apart. I like to spread a thin layer of the cheesecake batter evenly onto the base first before adding the strawberries for more support, then pour most of the cheesecake batter in.

Stick in full strawberries in the middle of the cake and then add the rest of the batter in. Using an offset spatula, make an even surface and make sure the strawberries are well covered. Easy-peasy japanesy?

Monday, 13 August 2012

Cottony-Soft Japanese Cheesecake


Today was a complete disaster! Just when I thought the day started off beautiful where I managed to come across fresh punnets of strawberries on sale in the supermarket and shopping for ingredients with a good mood to bake...I ended up scratching my car :( I don't want to go through the details of how everything that lead to that but it really affected my mood for most of the day, but more importantly dreading the moment when I have to face my parents about it. I knew some scolding was coming along, it was just a matter of sooner or later. So then I thought just to ease off everyone's pain by a little bit, I thought I'd bake a Japanese cheesecake to atone for my mistakes.

I love the Japanese cheesecake as its texture is so different to the classical cheesecake. It's like a combination of a cheesecake and sponge cake giving it a cottony-soft texture that melts in your mouth straight away. It won't even feel like you've had a slice because it is so light compared to the regular cheesecake where the richness of the cream cheese will make you feel bloated.

This cake always tends to sink when I leave the oven door ajar for an hour before bringing it out. Well, well what can I say. A sad mood broods an ugly cake. I know it looks no where near as good as Ju's but then if it's cooked and it tastes delicious, what more can you ask for?

Japanese Cheesecake

(adapted from The Little Teochew)

140g caster sugar
6 egg whites
6 egg yolks
1/4 tsp cream of tartar
50g butter
250g cream cheese
100ml fresh milk
60g cake flour (I use plain flour)
20g corn flour
1/4 tsp salt

1. Preheat the oven to 160°C. Line the bottom and sides of an 8-inch round springform cake tin with baking paper. Wrap the bottom of the cake tin with aluminium foil to prevent the cake mixture from seeping out!

2. In a heatproof bowl, melt the cream cheese, butter and milk over a stove of hot boiling water. Cool the mixture. Fold in flour, cornflour, salt and egg yolks and mix well.

3. Whisk the egg whites with cream of tartar until it's foamy. Add in the sugar and whisk until soft peaks form. Beat at high speed for approx. 1min and then change to low speed for the last 3-4mins.

4. Add the egg whites to the cream cheese mixture and fold well. Pour the mixture into the cake tin and bake in a water bath (tray of water on the rack below the cake tin) for 1hr 10mins or until set golden brown. Leave the oven door ajar for an hour before bringing the cake out of the oven.