Showing posts with label Macarons. Show all posts

Wednesday, 15 May 2013

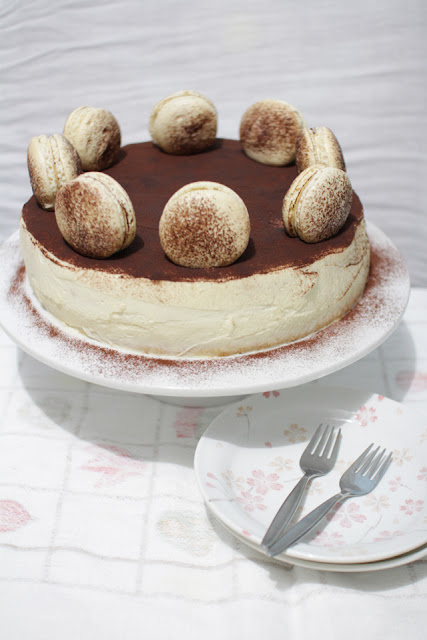
A Tiramisu hybrid: Tiramisu Chiffon Cake and Macarons

How can I ever get sick of tiramisu? Maybe never. It's quite a challenge yet refreshing to bake something different to the original version. I had this cake envisioned in my mind for about a month now and had finally put it altogether for Mother's Day. It's a day to celebrate everything that a mother can give, the unconditional love, the wise advice, the shoulders that spread like wings for us to lean on. She's the pillar of the family that keeps everything in harmony and she's the definition of blissful happiness even though she doesn't appear to be perfect to others. I just wanted to say Happy Mother's Day to my beautiful Mother as well as to all the amazing mum's out there.
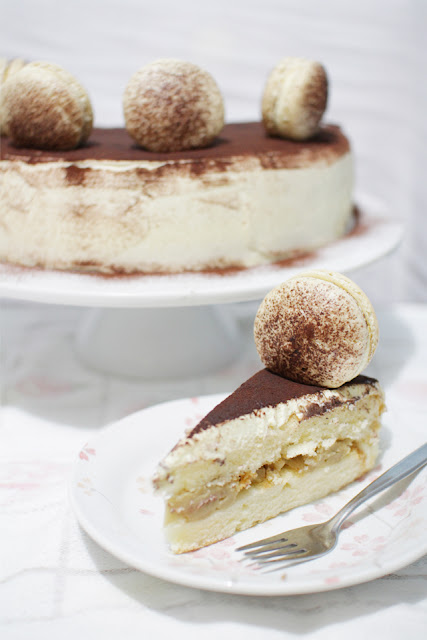
Personally, I had cravings for a chiffon cake which then sort've replaced the idea of using a sponge cake instead which would've fitted the tiramisu hybrid theme better. The day was quite a disaster. The chiffon cake dried up overnight since I didn't wrap it in cling film to keep it moist. But luckily it was saved in the end when it got covered by the mascarpone topping. I should've made double the amount of coffee creme patissiere to spread between the layers since I was struggling to have it evenly spread across the cake and a lot of my macarons cracked to my disappointment. It seems like disasters befall whenever I want to deliver the best. Fortunately, everything still tasted good and that was what matters. The coffee crème patissiere wasn't too sweet and the cocoa powder sifted on top gave this cake a good balance in regards to the sweet scale.
There are a few variations that could've been made I guess. You could soak the cake in coffee syrup to maintain it's moisture to have it more like a tiramisu-styled cake. A coffee flavoured chiffon cake or even a sponge cake would suffice. Crème patissiere is hard to spread so you could defrost it first then spread it out or replace with a coffee cream or frosting you like. Whatever you wish to do, have fun and enjoy the cake!
 

Tiramisu Chiffon Cake and Macarons

Coffee Macarons
(adapted from Bravetart)
 
115g almond meal
230g icing sugar
144g egg whites, room temperature (You can zap fresh egg whites from the fridge in the microwave on defrost for 10 seconds)
72g caster sugar
1 teaspoon water
1 teaspoon coffee powder
1. Sift the almond meal and icing sugar together in a medium bowl and set them aside.

2. Mix the water and coffee powder together in a small bowl. Using an electric mixer in a medium bowl, beat the egg whites together with the caster sugar and coffee mixture at medium speed for 3 minutes (4 on a Kitchenaid).

3. Increase the speed to medium-high (7 on a Kitchenaid) and whip for another 3 minutes, then increase to highest speed (8 on a Kitchenaid) and beat for another 3 minutes. You should have a very stiff, dry meringue, if not beat for another minute or until it does so. When you remove the whisk attachment, there will be a clump of meringue in the centre, just knock the whisk against the bowl to free it.

5. Dump in the sifted dry ingredients all at once and fold them with a rubber spatula. Use both a folding motion (to incorporate dry ingredients) and a rubbing/smearing motion to deflate the meringue against the side of the bowl. Take care not to overmix, the mixture should flow like lava and a streak of mixture spread over the surface of the rest of the mixture should disappear after 30 seconds to a minute. Approximately around 30 strokes/folds of the batter will be just enough.

6. Place in a piping bag and pipe rounds of about 3cm diameter on lined baking sheets or silicon baking mats. Hold onto the baking sheet and tap them hard against your bench top to remove any extra bubbles from your piped shells. Sift some cocoa powder on top if desired. Preheat the oven to 150° C/130°C fan-forced. Leave shells on bench to dry for about 30 minutes to an hour, or until a shell forms around the piped macaron (I generally leave them for 20-30 minutes).

7. Bake for about 18 minutes, or until you can clearly peel the parchment paper away from a macaron. Cool thoroughly on the pans before peeling the cooled macarons from the parchment. Use a spatula or plastic scrape if necessary.

8. Pipe the mascarpone frosting (recipe below) on a macaron shell, then sandwich it with another macaron shell. Refrigerate overnight. Can be stored in the fridge in an airtight container for several days.
 
Chiffon Cake
(adapted from Inspired Nest)
 
Part I
6 large egg yolks
3/4 cup water
1/2 cup vegetable or canola oil
1 teaspoon vanilla extract (I use vanillin)
3/4 cup caster sugar
2 1/2 teaspoon baking powder
1 teaspoon salt
1 1/2 cup plain flour
 
Part II
6 large egg whites
1/2 teaspoon cream of tartar
3/4 cup caster sugar
 
1. Preheat the oven to 175°C/155°C fan-forced. Sift flour, baking powder and salt in a bowl and set aside.
 
2. In a large mixing bowl, beat egg yolks, water, oil, vanilla and sugar together until combined. At low speed, add in the flour mixture and beat until the batter is smooth.
 
3. In another large mixing bowl, beat the egg whites and cream of tartar at high speed for approximately 1 minute. Reduce to medium speed and gradually add in the sugar. Continue beating until very stiff and shiny. Be careful not to overbeat the egg whites. Do the overturn test where the egg white mixture shouldn't fall out from the bowl.
 
4. Using a spatula fold in the egg white mixture into the egg yolk mixture until well combined.  
 
5. Bake in a 9-10 inch no non-stick cake tin for 55-65 minutes or until the cake springs back when lightly touched.
 
6. Invert and cool in cake tin over a wire rack. When cool, loosen edges with a knife and remove from the cake tin.
 
Notes:
- I used 2 no non-stick cake tins (25cm in diameter and 5cm in height).
- Don't fill cake batter more than 1/3 full of the cake tin or else there'll be an overflow.
- The remainder of my cake batter was put into cupcake moulds and baked for approximately 30 mins
- Be gentle when removing the cake from the tin, because it sticks to the base the cake can rip easily.

 
Coffee Crème Pâtissière
(Note: I would double the amounts below to use for the entire cake)
3 egg yolks
60g caster sugar
25g cornflour
1 teaspoon instant coffee powder
1/2 vanilla pod (I substituted with 1/2 teaspoon vanillin)
250ml whole milk
15g unsalted butter, cubed

1. In a large saucepan boil milk and vanilla over low-medium heat. In a medium bowl, whisk egg yolks, sugar, cornflour and green tea powder together.

2. Slowly add boiled milk to the egg mixture whilst whisking. Return mixture to the stove over low-medium heat and continue whisking until it gets thick in texture.

3. Add in the butter and whisk until melted and crème is smooth. Put a cling film over and leave to cool in the fridge for 30-60 minutes. It can also be left overnight.
 
 
Mascarpone Frosting
(adapted from Martha Stewart)
 
250g mascarpone cheese
400g thickened cream
1/2 cup icing sugar, sifted
 
Using an electric mixer at medium speed, beat the cream until stiff peaks form. Be careful not to overbeat. In another bowl, beat the mascarpone cheese and icing sugar until smooth. Gently fold the whipped cream into the mascarpone mixture until fully incorporated. Use immediately.
 
 
Assembly
1. Spread the coffee crème patissiere as evenly across a layer of cake with a metal spatula running under hot water. Place the second layer of cake on top.
 
2. Crumb coat cake with a thin layer of the mascarpone frosting around the cake then spread the remainder afterwards. Dust cocoa powder on top if desired.
 
3. Place the tiramisu macarons on top of the cake when serving, or else it'll become soggy.
 

Wednesday, 13 February 2013

Chinese New Year Baking Project 2013!

White Chocolate Raspberry Cupcakes and Dark Chocolate and Cherry Brownie Tarts
Gong Xi Fa Cai! Happy Chinese New Year! May the year of the snake be a prosperous year where you'll be entwined with good fortune, good health and happiness. One other good news that I'd like to share with everyone is that I finally got myself a DSLR! I'm so happy with my upgrade from a 5 mega pixel digital camera (yes it's old!). I've always been envious of the high quality shots with the fine resolution and focus in the photos that people take, and now I can finally say that I've joined the pack. Exposing myself into the new world of photography is like learning a completely new language. My head gets confuzzled with all the jargon used in photography and therefore it'll definitely take me a while to try and configure everything. But otherwise, I'm filled with the excitement of becoming a pro shutterbug.
For weeks I have been brainstorming for ideas of what I should bake for chinese new year and in return that nearly made my head explode with the infinite choices that I can decide on. A lot of things did not go into plan on my new year's eve baking bonanza and most of it was due to my lack of organization and foresight. Cheesecakes were originally part of the plan but the refrigerator was jam-packed with groceries which will then be filled with food leftover from new year eve's dinner. Well, I'm not surprised here since history repeats itself every year. It was always a nightmare for me to feed on the same dishes for a whole week as my parents crazily cook more than our stomachs can handle. Luckily, the handbrake was pulled this year and we only have a reasonable amount to deal with.
I had to say that most of the things I baked were decided in a spur of a moment during the day as I was trying to work with what's already in the pantry and what nibbles would be suitable for guests who will come over to celebrate new year with us. My sister, S and I made a batch of honey joys where the majority were shamefully finished by us instead of the guests. The honey joys were nostalgic to have. It's one of those easy-to-make and simply delicious sweet treats that we had to learn to make back in the days of high school.

Cupcakes are always a must in my list to do's for chinese new year as it's simple to serve to guests and this year I decided on making white chocolate raspberry cupcakes. I love the combination of those two flavours together. The natural pinkish-red colour of the raspberry was one of the main reasons chosen as to fit in with the CNY theme. It's definitely no chinese new year treat unless you have some red colour in your desserts...at least in my opinion. These cupcakes are made by simply grabbing a trustworthy plain vanilla cupcake recipe that you have and then just add in white chocolate bits plus a cup of raspberries.
Disasters tend to befall when I'm not organised with anything and same goes with the dark chocolate and cherry brownie tarts. When I started cooking the butter and chocolate, I realised that I ran out of brown sugar. Panic, self-blames and cursing (oops no cursing on CNY) all took place in an instant. But then I decided to take a gamble and use caster sugar instead and luckily the brownies still worked out well. Appearance wise, I realised it probably wasn't the best decision to use cherries as the skin looked old and wrinkly after some harsh exposure in the oven. Otherwise, the texture was smooth and very delicious to eat.

Baking continued to go downhill when I overmixed my macaronage a little where the macarons turned out to be pink rather than red. In my mind I thought this batch had to be thrown away as they looked like flat pancakes when piped out. But these little babies rose to my surprise and actually had 'feet'.

Dark Chocolate and Cherry Brownie Tarts

(recipe adapted from Donna Hay's magazine 10th birthday collector's edition, Issue 59)

200g dark chocolate (70%), chopped
60g butter
½ cup (90g) brown sugar (I used caster sugar instead)
¼ cup (60ml) thickened cream
3 eggs
¼ cup plain flour
250g cherries, pitted and halved

1. Preheat oven to 150°C/130°C fan-forced. Lightly grease 4x10cm-round springform cake tins lined with non-stick baking paper (I used 2x10cm-round cake tins and a 20cm square springform cake tin).

2. Place the chocolate, butter, sugar and cream in a medium saucepan over low heat and stir until melted and smooth.

3. In a separate bowl, whisk the eggs and flour until well combined. Whisk in the chocolate mixture until combined.

4. Pour mixture into the cake tins and top with the cherries. Bake for 35-40 minutes or until the skewer comes out clean. Serve the tarts with chocolate ganache or fresh cherries.

Honey Joys

(recipe adapted from Kellogg's Cornflakes)

90g butter or margarine
⅓ cup sugar
1 tbsp honey
4 cups corn flakes

1. Preheat oven to 150°C. Line a patty pan with paper cases.

2. Melt butter, sugar and honey together in a saucepan until frothy.

3. Add in the corn flakes and mix well.

4. Working quickly, spoon mixture into the paper patty cases. Bake for 10 minutes. Cool before serving.
 

White Chocolate Raspberry Cupcakes

Standard plain cupcake recipe (that makes approx. 20-25 cupcakes)
100g white chocolate, roughly chopped
1 cup raspberries, fresh or frozen, roughly chopped (optional)


Macarons

Please refer to this post for the macaron recipe. Filling was just whipped cream topped with a raspberry. Sorry, I forgot to measure how much cream I've used here.

Friday, 11 January 2013

Blueberry Cream Cheese Macarons

Macarons are a work of art in baking. Petit, delicate and simply sweet. Such a popular sweet that many people go crazy for, all thanks to a certain tv show. Even the two little twirps sisters at home can have FIVE  or more at one go. I do not have that crazy ability unfortunately...level down as a cake monster here, or should I say, sweets monster. As you can tell, the batch never lasts long in my household. There aren't many ingredients required to make this but mixing the macaronage to the right texture is such a fickle thing to do. Macarons have always been the bane of my existence due to many of my past failures. It really hurts each time a batch of macarons fail because of the costly almond meal and the amount of egg whites gone to waste. Previously, I never understood why macarons are so expensive but now I understand and appreciate the level of difficulty of getting everything just right to obtain the final product. It got to the point where I almost lost faith in myself with the potential to be able to produce pretty little macarons.

I've tried both the french and italian methods only to see them: flat as pancakes, cracked on top, do not 'feet'. There are numerous recipes and tips over the world wide web that you can read on, even video tutorials are available. I wished I did all of them earlier on to compensate for my numerous  mistakes. It all seems easy but then when it comes to baking it , it's a whole different story. But once you get it, you'll be jumping happily around like me and it'll appear to be more effortless, the more you bake them. A very good start to the new year for mastering picture-perfect macarons, 'Go me!'. I personally prefer the french method as I don't own a stand mixer and therefore I don't need to cope with having another person around helping to pour the sugar syrup in whilst beating the egg whites. French method is less complicated as well, which I like.
I've decided to bake a batch for Auntie L, who had selflessly helped me out a lot during the past 6 months. These little babies were happily boxed and wrapped up for her. Too bad, she didn't get them first hand when they were delivered to her house. Hope she's satisfied with what I put together for her.

Blueberry Cream Cheese Macarons

(recipe and tips adapted from Brave Tart)

Macarons
115g almond meal
230g icing sugar
144g egg whites, room temperature (You can zap fresh egg whites from the fridge in the microwave on defrost for 10 seconds)
72g caster sugar
½ tsp kosher salt (I didn't add this in)

1. Sift the almond meal and icing sugar together in a medium bowl and set them aside.

2. Using an electric mixer in a medium bowl, beat the egg whites together with the caster sugar and salt at medium speed for 3 minutes (4 on a Kitchenaid). They won't seem especially foamy at this point.

3. Increase the speed to medium-high (7 on a Kitchenaid) and whip for another 3 minutes, then increase to highest speed (8 on a Kitchenaid) and beat for another 3 minutes.

4. Turn off the mixer. Add in any colouring/flavour/extracts and whip for another 1 minute at highest speed. At the end of this minute, you should have a very stiff, dry meringue. When you remove the whisk attachment, there will be a clump of meringue in the centre, just knock the whisk against the bowl to free it. If the meringue has not become stiff enough to clump inside the whisk, continue beating for another minute, or until it does so.

5. Dump in the sifted dry ingredients all at once and fold them with a rubber spatula. Use both a folding motion (to incorporate dry ingredients) and a rubbing/smearing motion to deflate the meringue against the side of the bowl. Take care not to overmix, the mixture should flow like lava and a streak of mixture spread over the surface of the rest of the mixture should disappear after 30 seconds to a minute. Approximately around 30 strokes/folds of the batter will be just enough.

6. Place in a piping bag and pipe rounds of about 3cm diameter on lined baking sheets or silicon baking mats. Hold onto the baking sheet and tap them hard against your bench top to remove any extra bubbles from your piped shells. Preheat the oven to 150° C/130°C fan-forced. Leave shells on bench to dry for about 30 minutes to an hour, or until a shell forms around the piped macaron (I generally leave them for 20 minutes).

7. Bake for about 18 minutes, or until you can clearly peel the parchment paper away from a macaron. Cool thoroughly on the pans before peeling the cooled macarons from the parchment. Use a spatula or plastic scrape if necessary.

8. Pipe the cream cheese filling (recipe below) on a macaron shell, then sandwich it with another macaron shell. Refrigerate overnight. Can be stored in the fridge in an airtight container for several days.

Blueberry Cream Cheese Filling
(recipe adapted from ai love baking)

113g cream cheese, softened
25g icing sugar
25g blueberry jam or puree
50g unsalted butter, softened

1. Beat the cream cheese, butter and icing sugar until smooth.

2. Add blueberry jam or puree and mix until incorporated.  Chill to set.