Saturday, 29 September 2012

Milo Cupcakes with Condensed Milk Icing

These cupcakes are so lovely. Lovely is actually an understatement...these milo cupcakes are amazingly AWESOME! It's chewy, soft, crunchy on the outside and full of milo-ey goodness. How could you not love these cupcakes if you love milo to begin with? Milo is one of the things that defined my childhood and I still drink it to this very day. In my household, we pronounce it as 'My-lor' instead of 'My-low' and I like calling it 'my-lor' :)


Thanks to Steph who came up with this lovely creation...I mean awesome creation. I even had the
simplest pleasure and excitement of scooping out from the milo tin to add to the mixture, and I definitely added more milo than what was stated in the recipe. I personally find that adding at least 50g more of milo brings out more of the milo-ey goodness.

This brings me back to the memories of the first time when I made these milo cupcakes. I filled up them in ramekins and because I put in a bit too much, the mixture overflowed and dripped out in the oven. So in the end, it looked pretty ugly although it was still edible.

I love these owl cupcake bases that I've used. I couldn't resist them when I first saw them in the shops and I thought that this was no better time to use them. Look how cute and adorable they are.


I halved the amount for condensed milk icing as I had a hunch that I'll have a lot of leftovers if I
stuck to the original recipe. I also went a bit freestyle in making it given that I always use less icing sugar stated in the recipe. Halving the amount is unable to fill up all the cupcakes but it does leave options wide to those just prefer eating cupcakes plain by itself, just like my mother. I used a mixture of the owl cupcake base, patty cake bases and standard cupcake bases...as I feel like having petits within my choices for once. I found the milo cupcakes much more adorable in the patty cake bases compared to the standard cupcake bases.

Lastly, I would like to take this oppurtunity to wish my cousin-sister a Happy Birthday! We may be miles apart from each other but I wish you all the best :)

Milo Cupcakes with Condensed Milk Icing

(adapted from raspberri cupcakes)

200g plain flour
1 tsp baking powder
½ tsp bicarbonate of soda
200g caster sugar
170g unsalted butter, softened
2 large eggs
100g Milo (add more to taste if you wish)
1 tsp vanilla extract (I used Imitation Vanilla)
180g sour cream

1. Preheat oven to 180°C. Fill cupcake tray with liners.

2. Sift flour, baking powder and bicarb into a bowl and set aside. Using an electric mixer, beat the butter and sugar in a large bowl until light and fluffy. Beat in eggs one at a time.

3. Add sour cream, milo and vanilla and beat until just combined.

4. At low speed, beat in the flour mixture until just completely mixed. Fill the cupcake liners until 3/4 full and bake for approx. 15-20 minutes; until the skewer inserted into the centre comes out clean. Leave in the oven for a minute then let it cool onto a wire rack.

*If using a food processor, add in all the ingredients mentioned above and pulse until the mixture is combined and smooth.


Condensed Milk Icing
150g slightly salted butter, softened (I combined salted butter with unsalted butter)
300g icing sugar, sifted
5 tbsp sweetened condensed milk

Using an electric mixer, beat the butter until light and fluffy and then beat in the icing sugar. Add condensed milk and beat until combined. Pipe or spoon over on top of the cooled cupcakes and serve. Drizzle some extra condensed milk and finish with sprinkling some milo on top if it pleases you.

Sunday, 2 September 2012

No-Bake Lemon Cheesecake

Firstly, I'd like to take this opportunity to wish my papa a Happy Father's Day as well as to all the awesome father's out there! I've been meaning to come up with a 3 day baking marathon for father's day but I guess it was out of my league since I've got plenty of other important work-related stuff to do before Monday. I baked the banana cake mini's as my first instalment, knowing that my dad (and everyone else in my family) likes bananas...and not to mention that I had requests for an encore to bake the banana cake again, hehe. On the next day, I decided to make something rather simple that my dad had recently expressed his likings to, the No-bake Lemon Cheesecake. My sisters love it as well but on the contrary, mum and I personally prefer the classical baked cheesecake that I've always made in the past. I guess it's because the both of us cringe at the sour taste in desserts, although the cake is not explicitly sour. Mum and I are one of a kind where we've always had a sweet tooth and have minimal love for sour foods. Most of our dishes at home barely incorporate any sourness, only sometimes. I know certain people can eat a lemon or a grapefruit as it is (accompanied by salt or sugar at times) but I have low tolerance for it. You'll see me squirming and screeching when I eat something sour.

This cake doesn't take too long to bake which sort of makes me feel guilty about the amount of effort I've put into this special occasion. Originally, I wanted to decorate the cake to make it look a little more 'manly'...if there is such a word to describe a cake. Unfortunately, it turned out looking rather feminine and girly. I can't help it, Spring has just arrived and oooh! look at that lovely sunshine. I'm inspired to make something more light and vibrant to suit this season which turned out like...this. Sorry papa, you do live in a household that is dominated by women afterall...it's 4 against 1, heehaw.

For people who don't have an oven or that it is broken and waiting for it to be fixed, you don't need to be deprived from having cake as you only need to refridgerate it. Saves a lot of gas and electricity on your bill as well, haha.

No-Bake Lemon Cheesecake


125g unsalted butter, melted
Arrowroot biscuits, need approx. 20 biscuits (Marie or Nice biscuits may be used in place of arrowroot), finely crushed
500g cream cheese, softened
2 tsp vanilla essence (I use Imitation Vanilla)
1/3 cup lemon juice
a tin of condensed milk (395g)
Optional: zest of 1 lemon


1. Line the base of a 20cm springform cake tin with baking paper.

2. Make the biscuit base. In a bowl, combine the biscuit and butter and mix well with a spoon. Press firmly onto the base of the cake tin and refrigerate for approx. 30min. You may sprinkle in some caster sugar into the biscuit mix if you want to emulate the 'Nice' biscuit.

3. In a large bowl, using an electric mixer at medium speed, beat the cream cheese and vanilla until smooth.

4. Gradually add condensed milk and lemon and beat until smooth. I start off with 1/3 of condensed milk, then half of lemon juice and then repeat.

5. Pour the batter onto the biscuit base and refrigerate for 3-4 hours or leave overnight. Remove from tin and serve.


Tips:
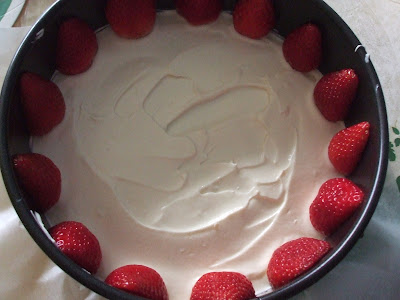
If you want to incorporate strawberries like what I've done, first of all, make sure they're all in similar height and not too tall or else you have strawberries poking out of your cheesecake. Strawberries ideally 3-4cm in height, approximately (or shorter). Cut the strawberries in half and line them up in the cake tin (as shown below) with equal distances apart. I like to spread a thin layer of the cheesecake batter evenly onto the base first before adding the strawberries for more support, then pour most of the cheesecake batter in.

Stick in full strawberries in the middle of the cake and then add the rest of the batter in. Using an offset spatula, make an even surface and make sure the strawberries are well covered. Easy-peasy japanesy?